DMANL01000001 MANUALE 4HEAT

1.ARCHITETTURA DEL SISTEMA
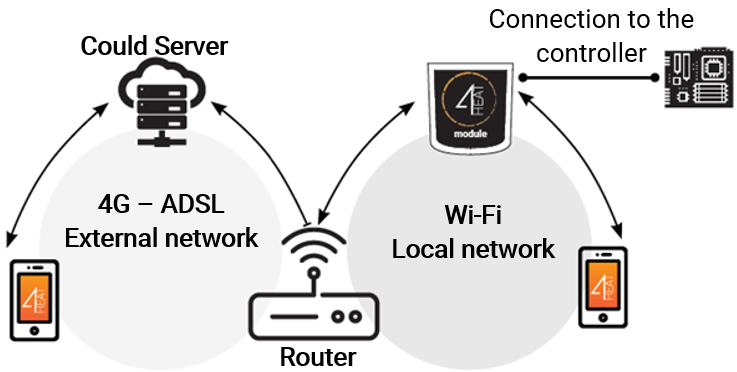
L’architettura prevede la presenza di 3 macrosistemi:
- 4HEATMODULE: dispositivo hardware che interfaccia la scheda di controllo TiEmme elettronica e il router Wi-Fi locale;
- SERVER CLOUD: infrastruttura web server che permette l’archiviazione dati e funge da centro stella nella comunicazione remota;
- 4HEAT: applicazione per smartphone disponibile da Google Play Store e da App Store in modo gratuito, che consente all’utente di interfacciarsi con il sistema di riscaldamento;
2.LOCAL CONNECTION AND REMOTE CONNECTION
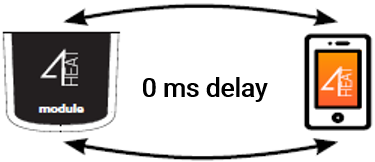
Local Connection:
The connection between the 4HEATModule and the APP is via the home Wi-Fi network, only if both are connected to the same Wi-Fi network.
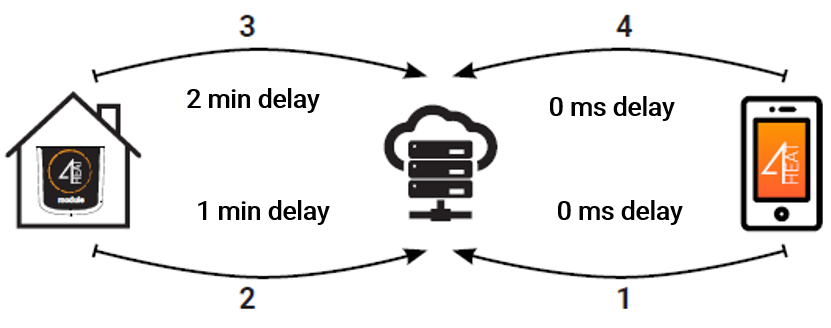
Remote connection:
We talk about remote connection when at the time of using the App, the user is away from home. In this case, the App uses the data coverage of your Smartphone and the cloud server allows the triangulation of the signal in order to manage the Module from a distance. Remote connection times may vary depending on data network traffic, network connection conditions and traffic to the server. In the worst case, connection times can be up to 5 minutes late.
3.MECHANICAL SPECIFICATIONS
|
RS485 communication ports |
4HEAT, 4HEATLite, WiKEY, PinKEY |
| RS232 communication ports | 4HEAT |
| Power Supply | 5V |
|
Casing |
ABS Housing |
|
Temperature range |
-20 ° ÷ 60 ° |
| Fastening | 3.5mm self-tapping screws |
| 4HEAT | 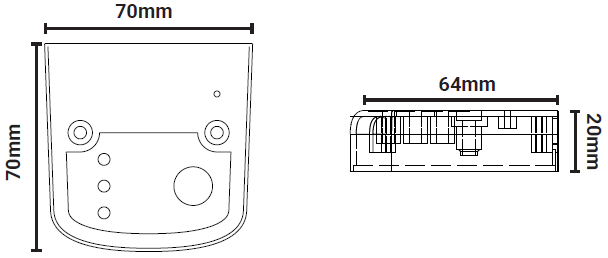 |
|---|---|
| 4HEAT Lite | 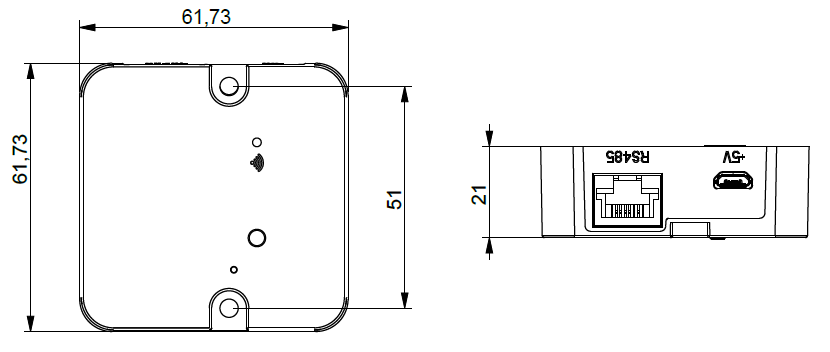 |
| WiKEY | 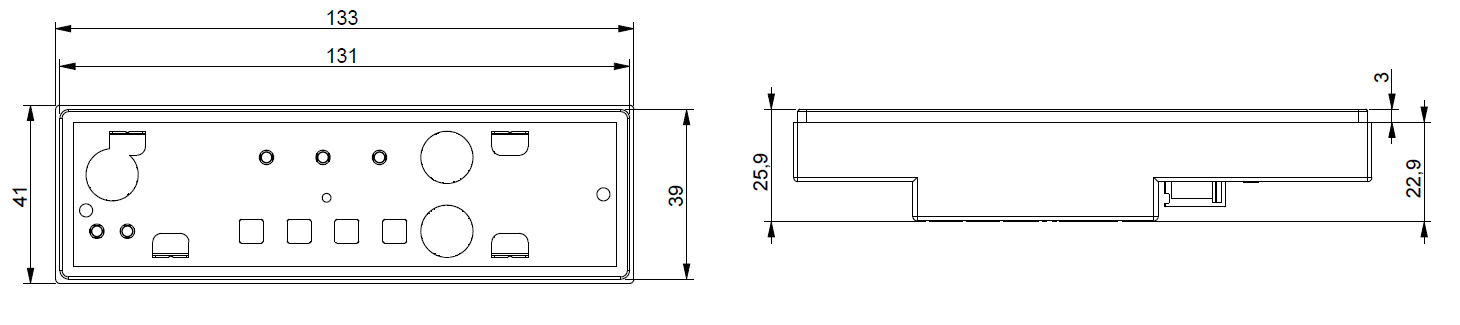 |
| PinKEY in box | 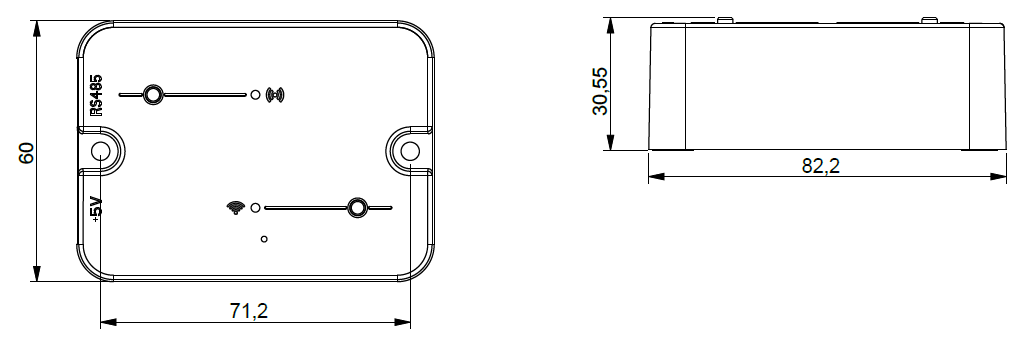 |
| PinKEY recessed |  |
|
|
TiEmme elettronica only guarantees operation of the device with the supplied cables. |

4.BUTTONS AND LED POSITIONING
| 4HEAT | 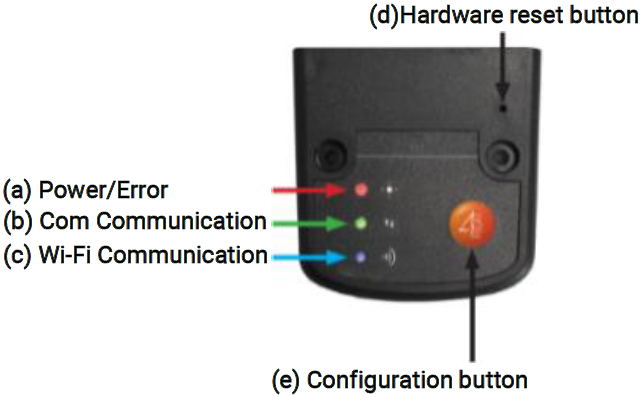 |
|---|---|
| 4HEAT Lite | 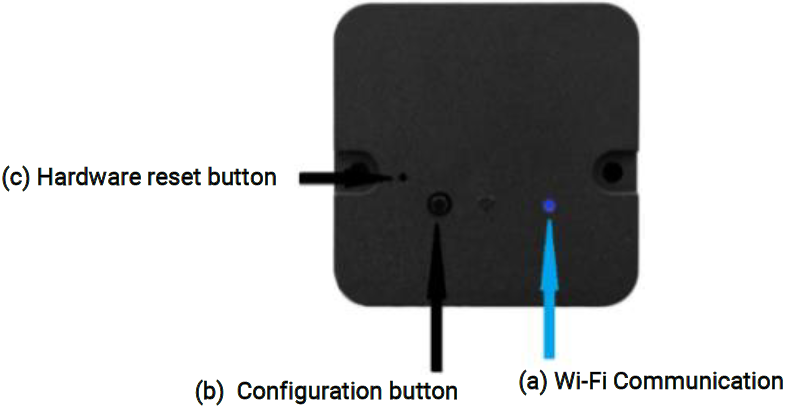 |
| WiKEY |  |
| PinKEY in box | 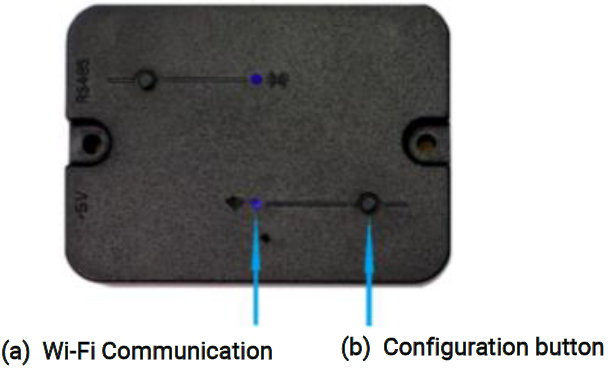 |
| PinKEY recessed | 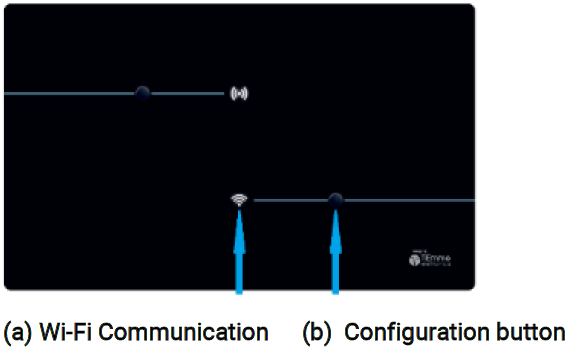 |
5.INSTALLATION
The following procedures must be carried out to test the device:
-
Connect the 4HEATModule to the power supply:
- 4HEAT: Red(a) solid led and Green(b) flashing led;
- 4HEAT Lite: (a) solid Red led;
- WiKEY: make sure that the heating system is connected to the mains;
- PinKEY: Red solid WI-FI led (a);
-
Connect the 4HEATModule to the TiEmme elettronica board using the cable provided in the kit:
- 4HEAT:solid Red led (a) and solid Green led (b);
- 4HEAT Lite:the Led (a) must be Solid Red, if at the end of the configuration procedure the Led (a) becomes solid Green the device is not communicating correctly with the controller, make sure that the device is connected correctly and the heating system is connected to the mains;
- WiKEY: already connected to the heating system;
- PinKEY: the Solid Red WI-FI led (a), if at the end of the configuration procedure the Wi-Fi led (a) becomes solid Green the device is not communicating correctly with the controller, make sure that the device is connected correctly and the heating system is connected to the mains;
- Wi-Fi communication:with the solid Blue Led the communication with the APP is successful and the device is communicating correctly, while in the WiKEY the Wi-Fi led will be solid;
- Hardware reset button: press in case of persistent product malfunction. There is no reset button in the WiKEY device.
|
|
|
6.NEW 4HEATMODULE CONFIGURATION
It is recommended that you immediately connect your Smartphone to the Wi-Fi network and disconnect your mobile from the data connection.
When starting the application you are asked to select the language. The procedure for configuring the 4HEATModule device is explained below:
-
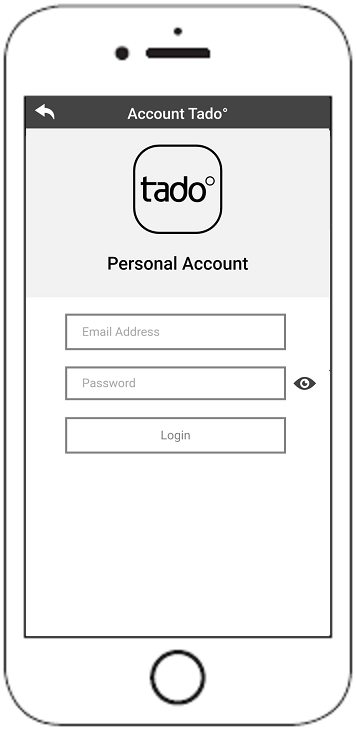
- Create an account with a valid email address and password of your choice by filling in all fields;
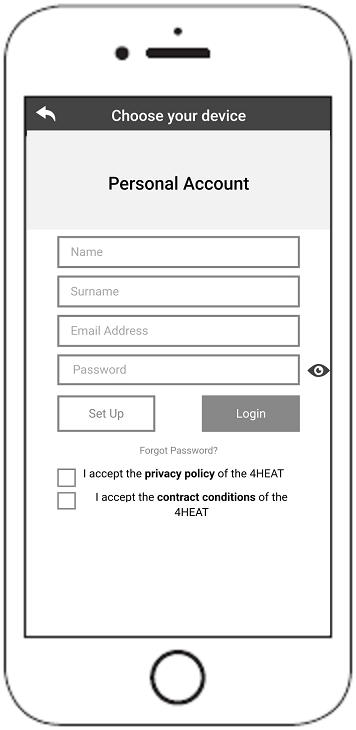
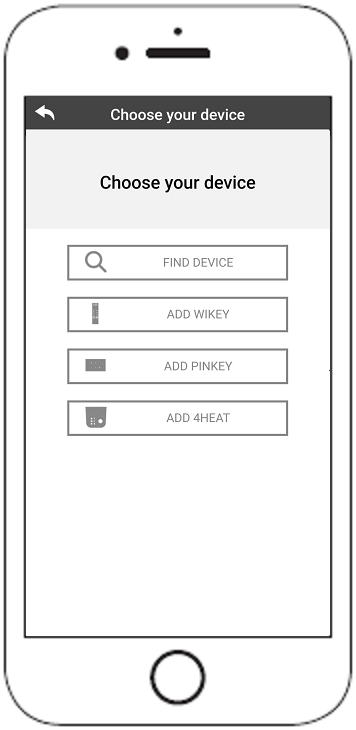
- Choose between “FIND DEVICE”, “ADD WIKEY”, “ADD PINKEY” and “ADD 4HEAT”.
- 4HEAT or 4HEAT Lite: select “ADD 4HEAT” and follow the tutorial;
- WiKEY: select “ADD WIKEY” and follow the tutorial;
- PinKEY: select “ADD PINKEY” and follow the tutorial;
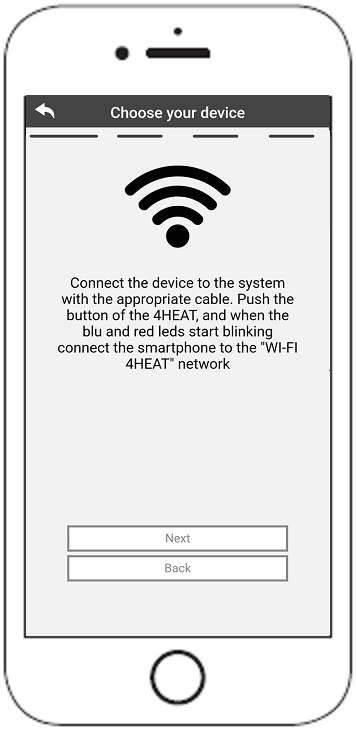
- The 4HEATModule creates a temporary Wi-Fi to which you have to connect with the Smartphone.
To connect your Smartphone to the Wi-Fi you have to go to setting -> Wi-Fi of your Smartphone, where the Wi-Fi list is displayed and you have to select “4HEAT WI-FI”. If your Smartphone asks to stay under this Wi-Fi network, you have to accept it otherwise the configuration cannot be done. This way the 4HEATModule will be connected to the app and the associated account. How to activate “4HEAT WI-FI” with the various Modules:- 4HEAT: press button (e), the Blue (c) and Red (d) LEDs start blinking alternately;
- 4HEAT Lite: press the button (b) and the Blue (a) LED will start blinking;
- WiKEY: press button (c) for 3 seconds until the three leds start blinking, then press button (b)and the Wi-Fi led (a) will start blinking;
- PinKEY:press button (b), the Wi-Fi (a) LED will start blinking.
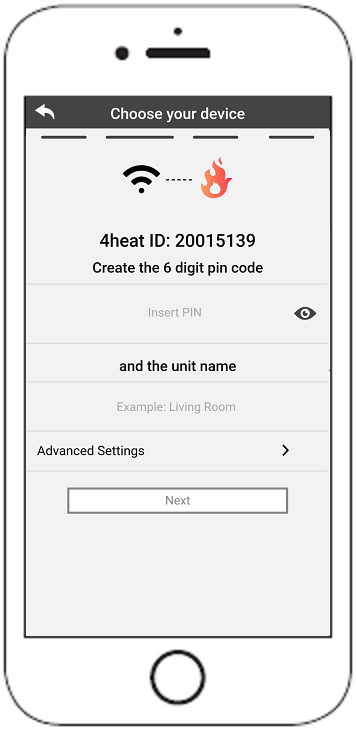
- Write a name for the device and enter a PIN of your choice. Each 4HEATModule device has its own name and password.
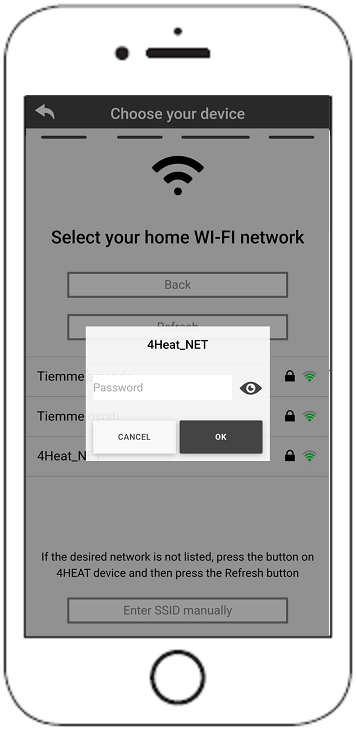
- Once the app and the 4HEATModule are connected you are asked at this stage to choose the home Wi-Fi to which the 4HEATModule device should connect;
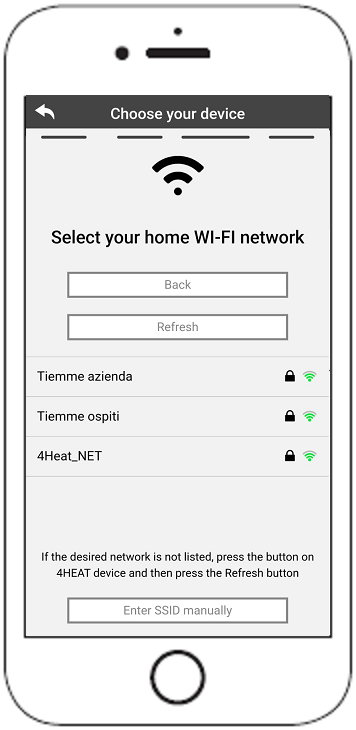
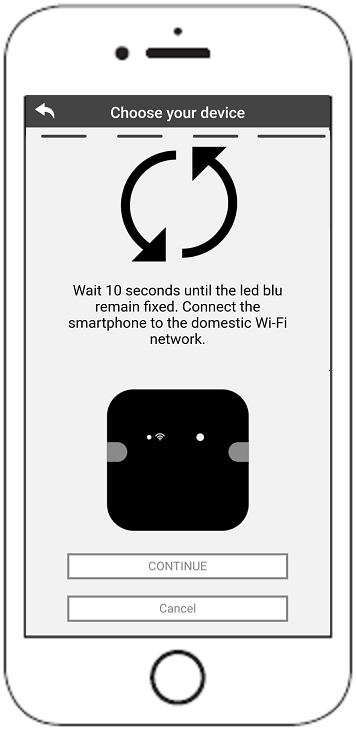
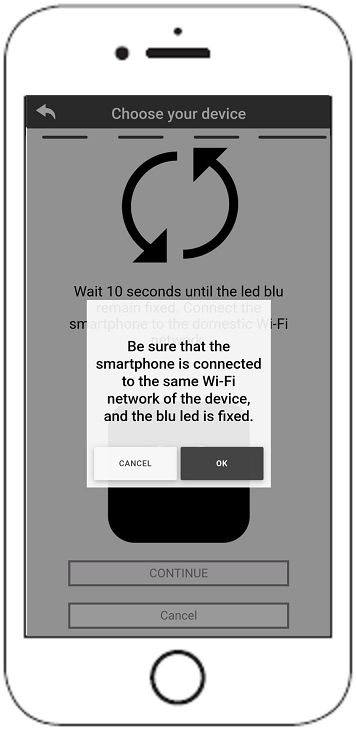
- Make sure that the smartphone reconnects to the home Wi-Fi appliance and that the Leds are fixed and do go on in the setup step.
- Create an account with a valid email address and password of your choice by filling in all fields;
|
|
If the configuration procedure was unsuccessful, you can reconfigure the |
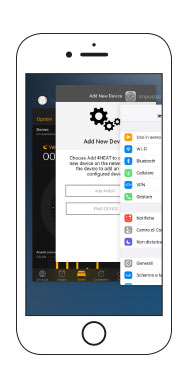
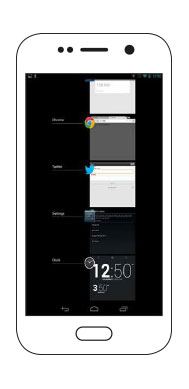
Once the 4HEATModule device installation procedure is finished, it is recommended to close the app and restart it.
Close the app between windows open in the background.
|
On Apple devices
|
On Android devices
|
 |
 |
|
|
The procedure may vary from smartphone to smartphone. |
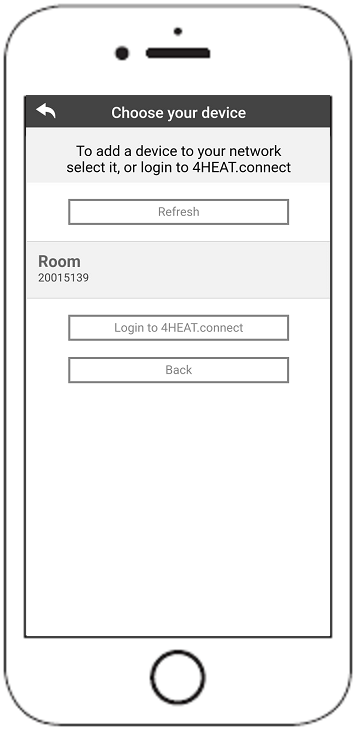
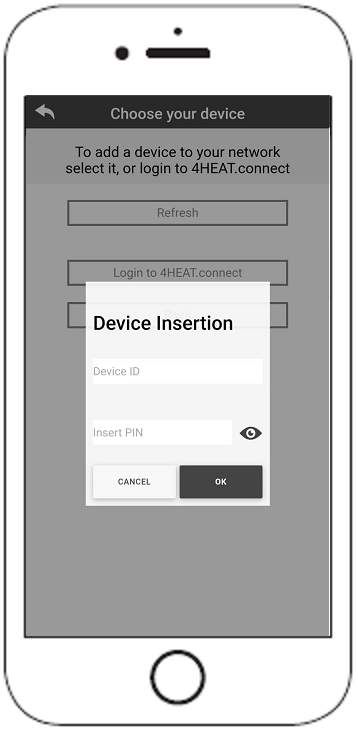
7.CONNECTION TO A 4HEATMODULE ALREADY CONFIGURED
In the “FIND DEVICE” section, you can connect to the 4HEATModule by entering the PIN code, only if the 4HEATModule is connected to the same Wi-Fi as the smartphone.
You can also connect remotely (using your smartphone’s data connection) by entering the login details of the already configured 4HEATModule device.
 |
 |
|---|---|
| Connected to the same WI-FI network | Connected remotely |
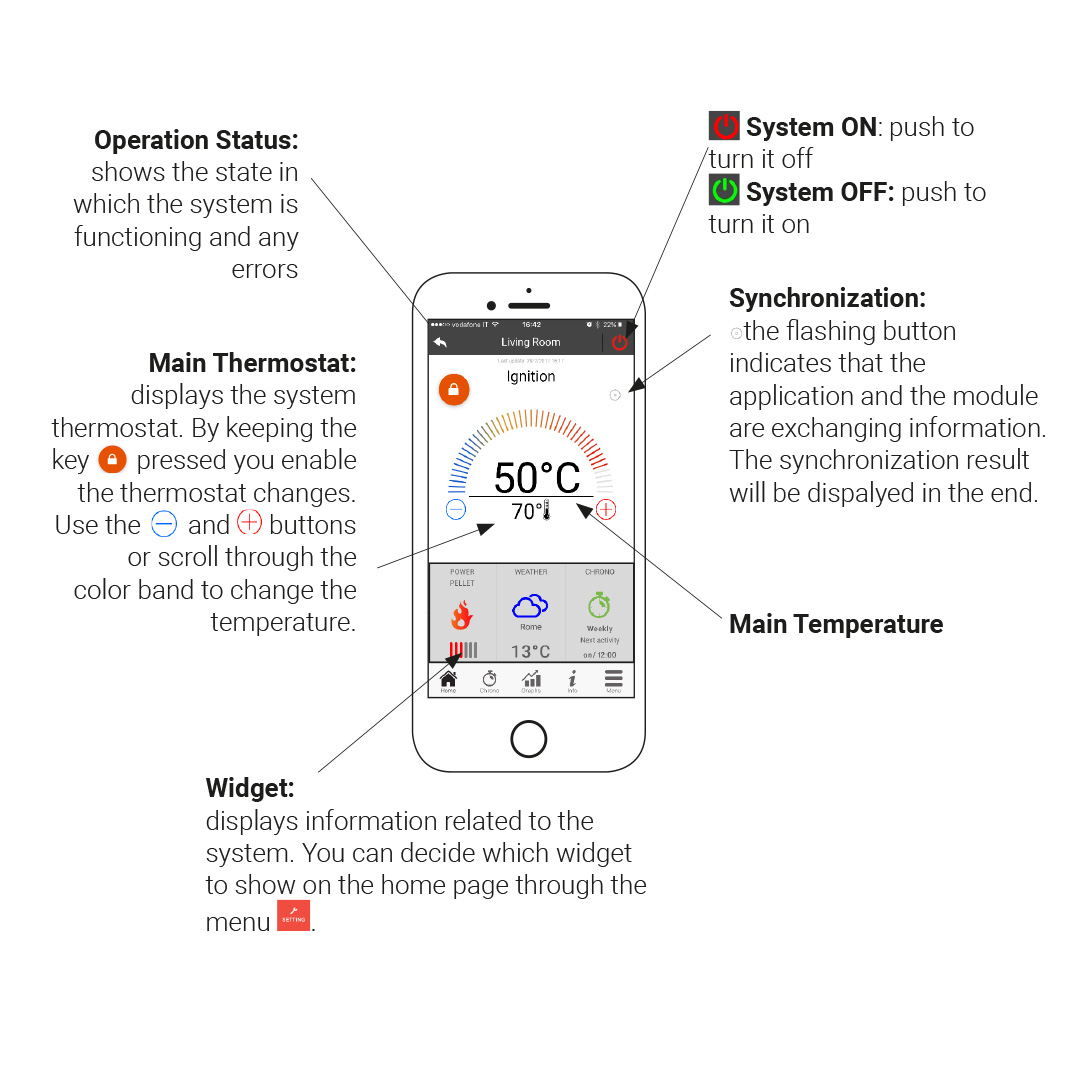
When a device is added or found, the Home Page displays the list of connected devices and the main temperature and status for each.
Associated 4HEATModule devices appear on the Home screen with their identification name.
It is reported:
![]() Operating state OFF
Operating state OFF
![]() Operating state BLOCK
Operating state BLOCK
![]() Operating status ON
Operating status ON
![]() Not connected or unreachable device
Not connected or unreachable device
![]() Updating required
Updating required
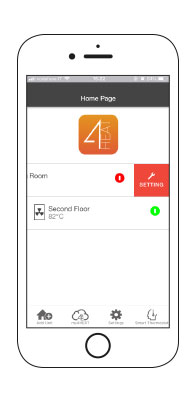
Access to the settings of the associated device. “SETTING 4HEAT”
8.HOME PAGE
 |
This menu allows you to configure another 4HEATMODULE device. “New 4HEATModule configuration”. |
 |
The my4HEAT menu lists the credentials of the devices associated with your app. |
 |
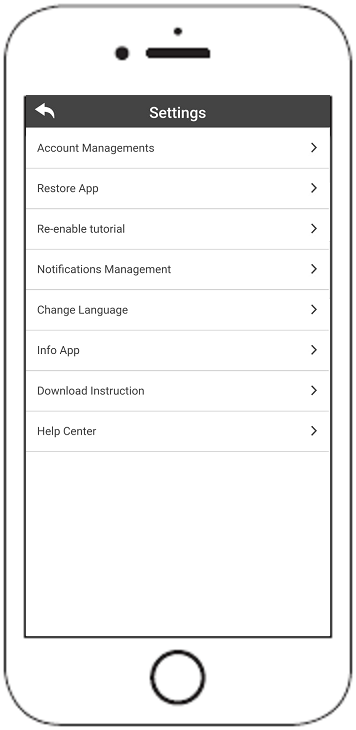
Within Settings, there are: |
|
|
 |
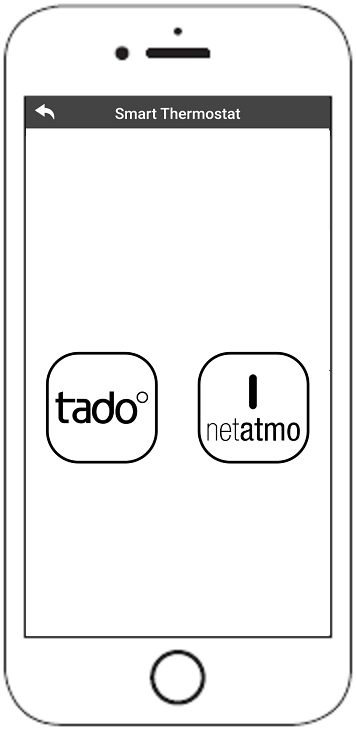
It allows you to connect to the management applications of the smart thermostats installed in your home system. |
 |
 |
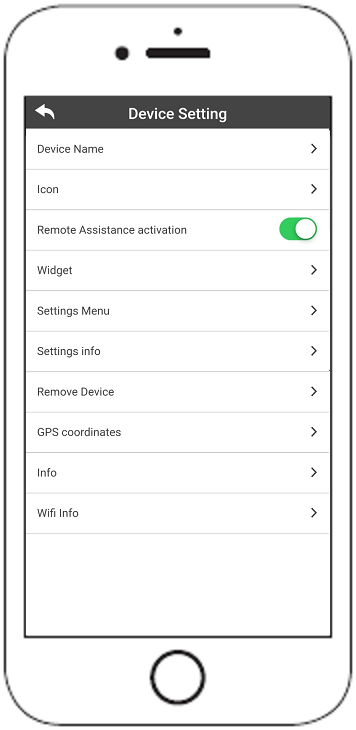
9.SETTING 4HEAT
Access to the settings menu regarding the selected 4HEATModule.
-
- Device Name : you can change the name of the device;
- Icon : changes the display icon of the unit on the home page;
- Remote Assistance activation : the user enables or disables the possibility of receiving remote technical assistance;
- Widget : allows you to select the widgets that appear on the main device management screen;
- Settings Menu : allows you to customise the display of menu functions. Some functions may not be available due to the configuration of the heating system. “MENU PAGE” ;
- Settings Info :allows you to customise the display of system values in the info menu. “INFORMATION PAGE”;
- Remove Device : allows you to delete the currently selected device;
- GPS Coordinates: The local weather, which appears as Widget, can be set manually by entering the desired latitude and longitude coordinates, or by using your Smartphone’s GPS. This menu is only displayed if you are on the same network as your device;
- Info : technical information regarding the product code of the control board and the firmware version of the Module;
- Wi-Fi info : information about the internet network to which the 4HEATModule device is connected. This information is only displayed if you are on the same network as the device.
10.4HEAT MANAGEMENT
11.CHRONO AND 24HEATING FUNCTION
By accessing the Chrono menu, the system management function can be set in two different modes. Pressing on![]() will access the modification of the function of your choice.
will access the modification of the function of your choice.
|
Chrono Mode ON |
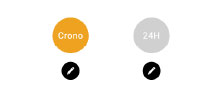 |
24Heating Mode OFF |
By entering the CHRONO function, you can set three different time slots to switch the heating system on and off.
Three types of programming can be chosen:
- Weekly: Monday to Sunday setting
- Daily: setting each single day
- Weekend: setting during the weekend (Saturday and Sunday) or during weekdays (Monday to Friday).

Each time this function is updated you must press the Save button which appears at the bottom of the screen. To reset the time slot use the basket that appears with the slide-touch to the right of the time slot .
The 24HEATING function allows you to manage your home heating, setting times and temperatures or powers, according to your daily needs.
During the tutorial, you are asked what name you want to give the weekly schedule and a few simple questions of daily routine.
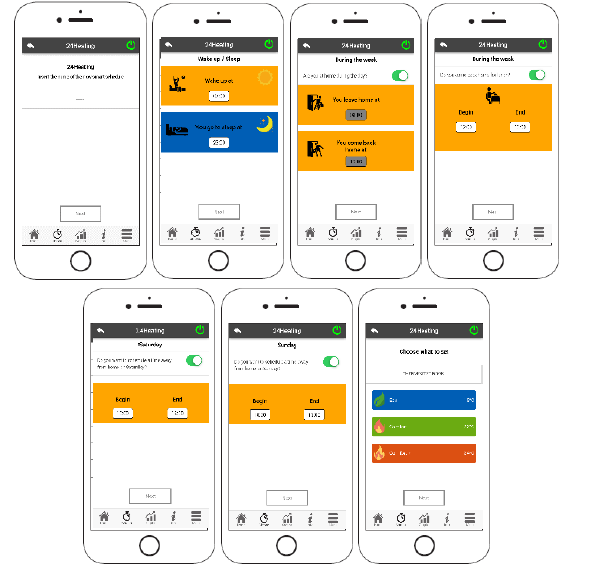
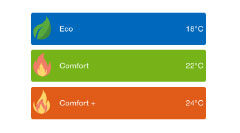
It is possible to choose the thermostat or the power for the three available bands.
 24HEATING allows you to manage time slots also from the main screen:
|
Choosing and creating a heating programme |
 |
Control buttons |
|
Time slots created by the procedure |
||
- 24HEATING Program management: the drop-down menu on the top left shows the programs set by the user. Select the cloud to enable the programme. Press on the symbol
 to change the thermostats or powers of each band;
 - Add time slot: by selecting the button
 a time slot can be split, as shown in the pictures:
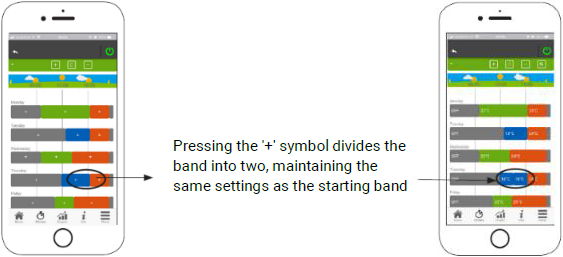
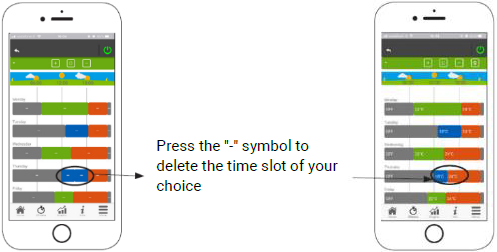
- Time slot Deleting: selecting the button
 allows you to delete a time slot, as shown in the pictures:
- Updating changes: the button
 synchronises the 24Heating with the device. Make sure to press this button each time you make a change otherwise the set data will be lost.
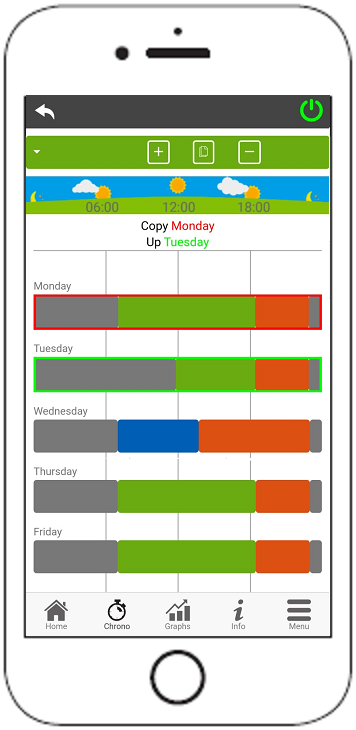
 - Copying a time slot: by selecting the button
 you can copy time slots from one day to another. When finished, press the confirmation button at the bottom of the page.
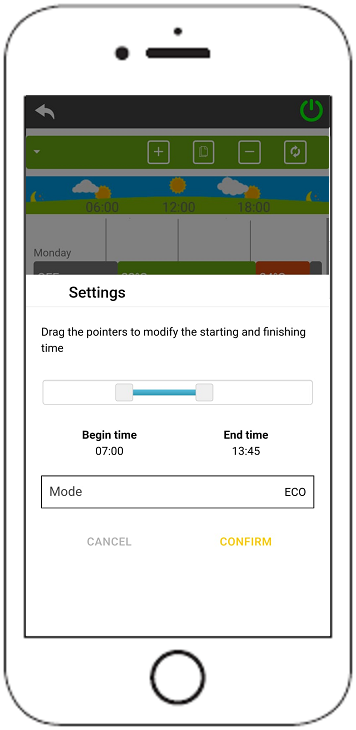
- Time slot modification: by pressing on a tie slot, you can access the management menu, time slots cannot be set below one hour of operation.
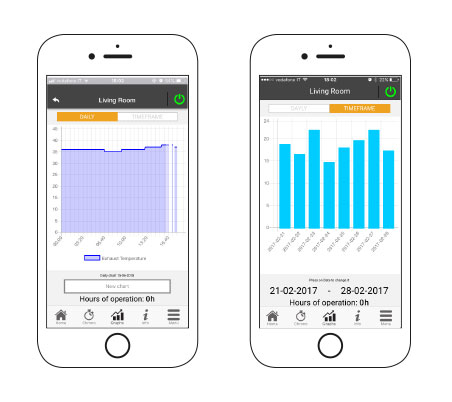
12.GRAPH VIEW
This section displays the graphs of the values logged on the server by the 4HEATModule. Two types of views are available:
- Daily: the displayed values are represented during the day of operation of the heating system. You can display the graphs of two time slots: 00:00/12:00 or 12:00/00:00. You can also choose to display the operating states of the heating system (Ex. Off/Run Mode/Block etc.). The recorded data remain in the memory on a weekly basis;
- Period: graphical representation on a weekly basis of the system operating hours. The recorded data remain in memory on a monthly basis.
13.INFO SCREEN
This screen displays all measured values recorded by the control board. The values to be displayed can be set via Info settings of the selected 4HEATModule device. “SETTING 4HEAT”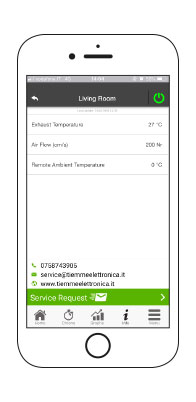
|
|
It is also possible to view the reference data of the service provider and to send any support requests by e-mail. |
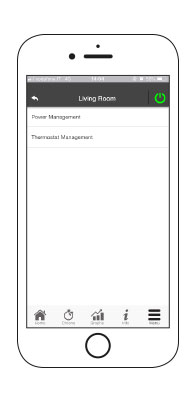
14.MENU SCREEN
On the Menu screen, you can access:
- Power Management: in this menu you can change the combustion power and/or the heating power;
- Thermostat management:allows you to modify the main thermostat and any other thermostats if required by the Heating System functions;
- Last errors list: inside there is a list of all the times the heating system has given an error, at the end of the list there is a back button.
|
|
The managements to be displayed can be set via Settings Menu of the selected 4HEATModule device. “SETTING 4HEAT” |
15.INTEGRATION
15.1.ALEXA
SETTING
It is possible to manage the operation of the 4HEATModule device with Alexa. The device 4HEATModule must be configured under the same Wi-Fi network Alexa will be set. After you have set up everything, you can configure Alexa with the 4HEATModule.
In order to run the 4HEATModule with Alexa it is necessary to download the “4HeatSK” Skill within the Alexa application by going to Menu→Skill and Games and search for Skill 4Heat.
Once you have found and selected the “4HeatSK” Skill click on Enable for use and follow the configuration procedure.
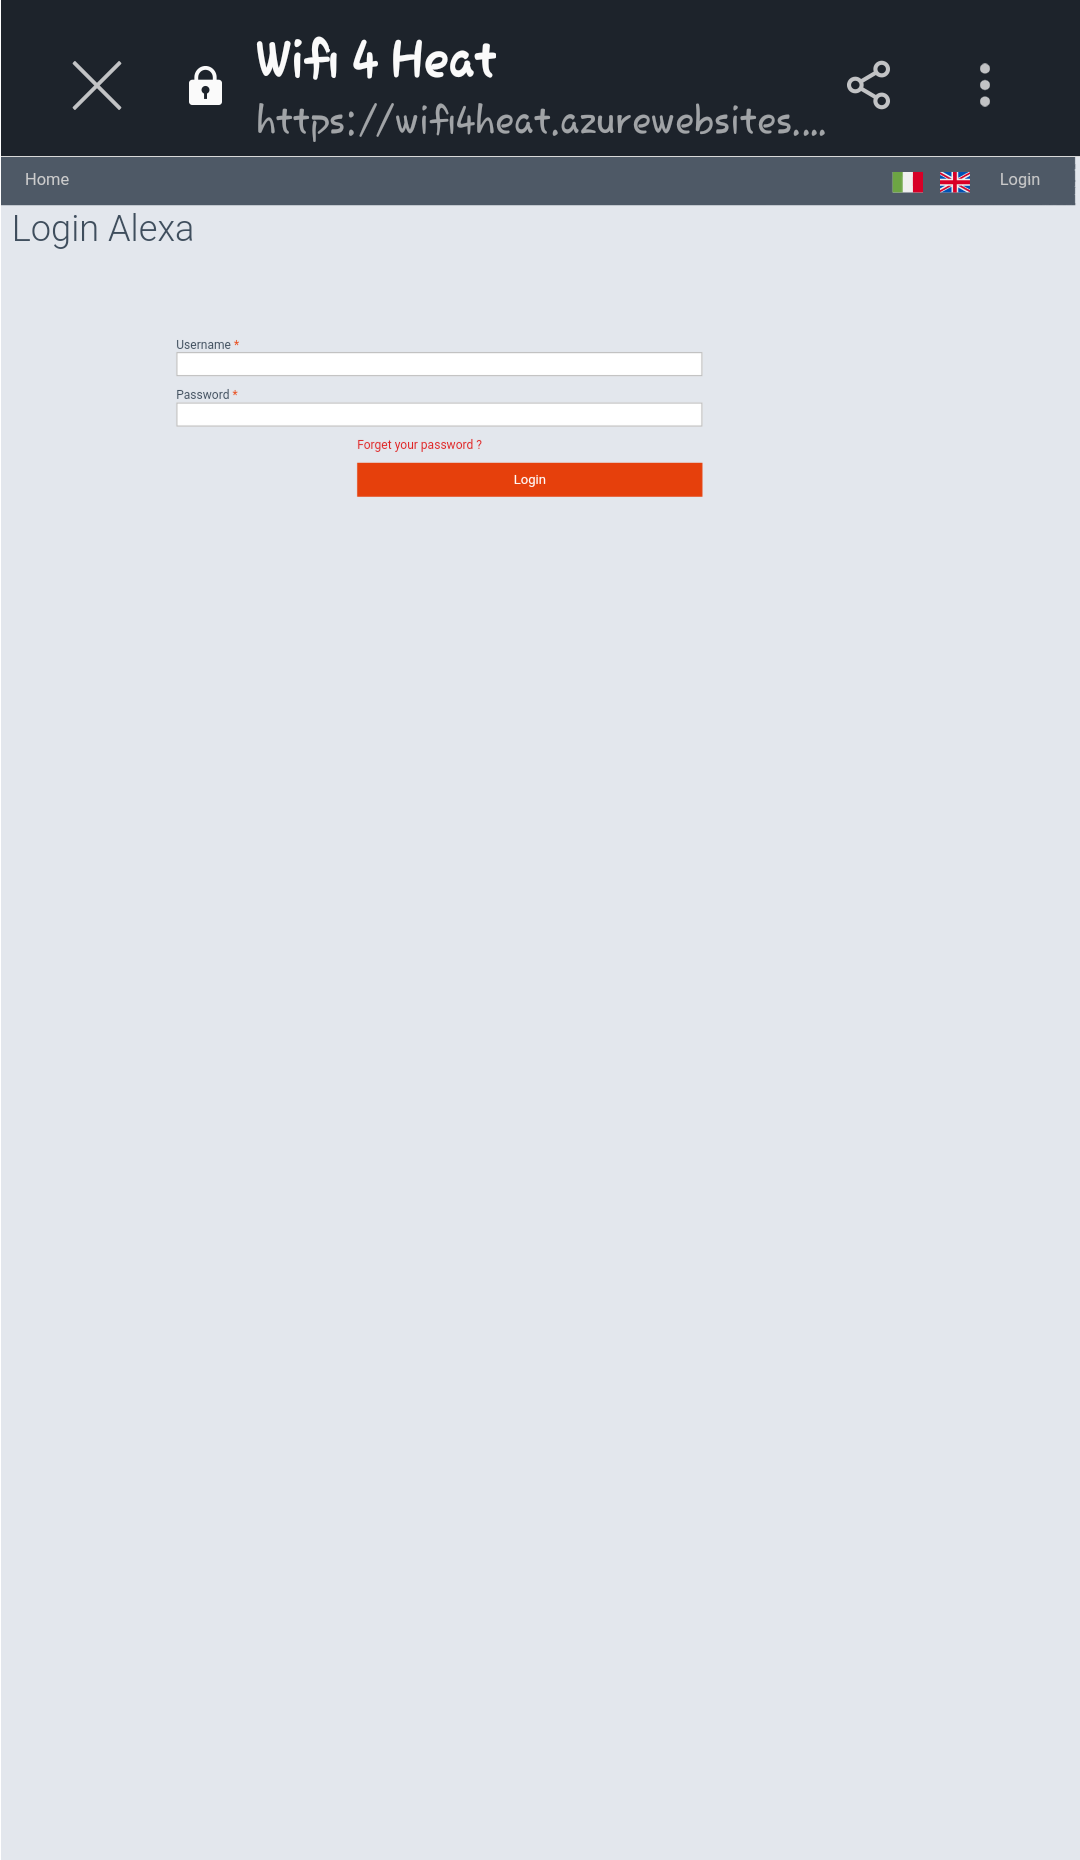
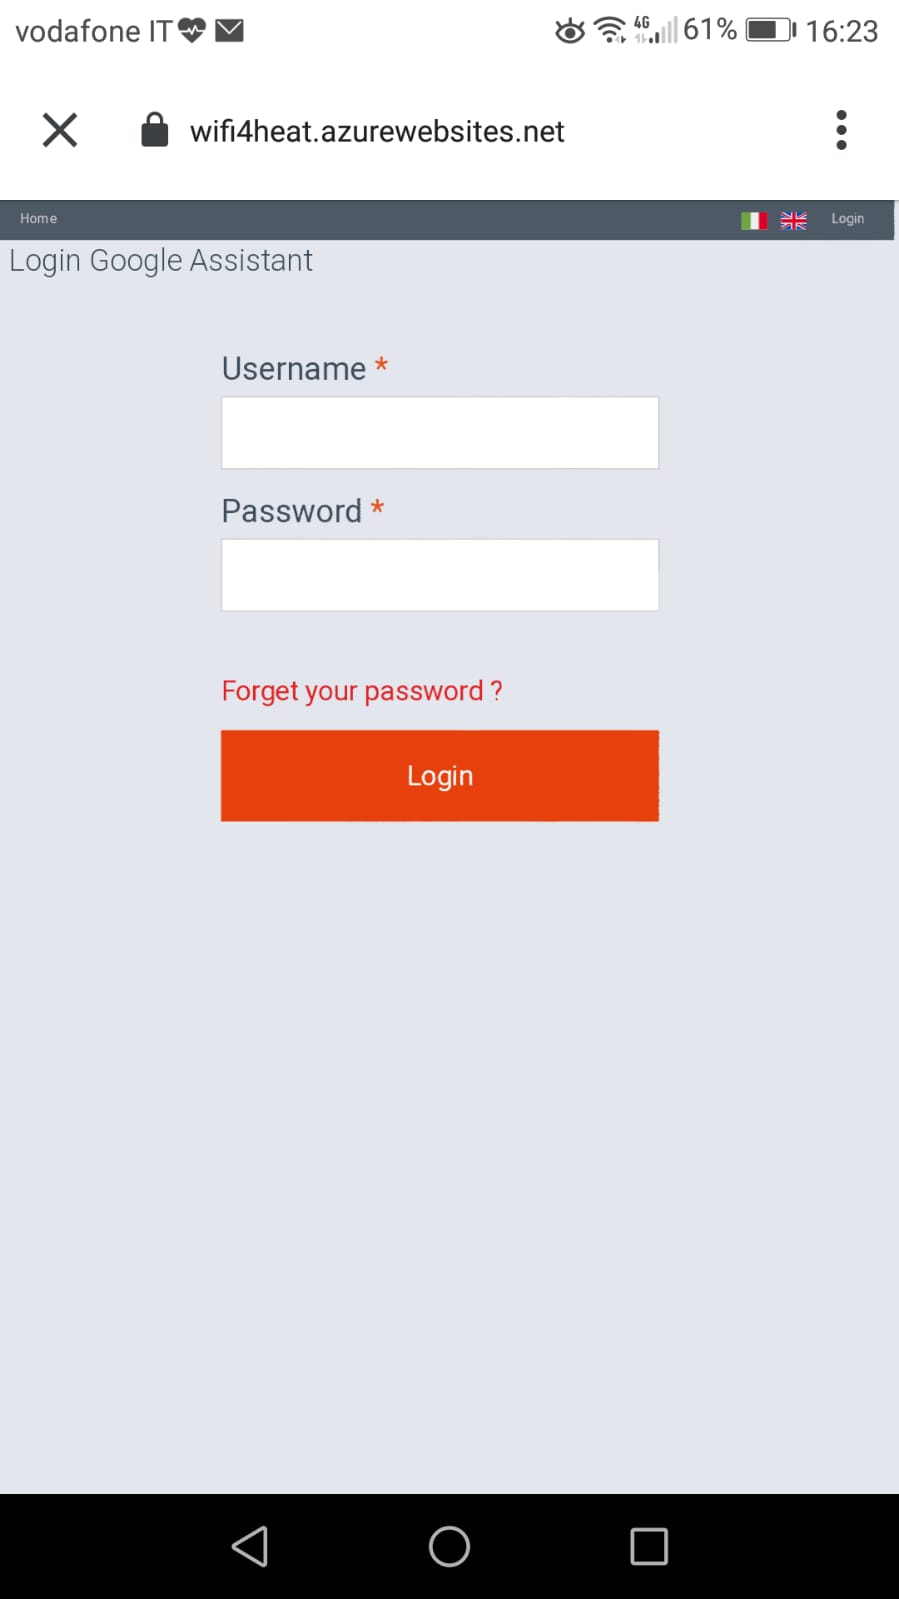
When asked for your email and password, enter the same one you used in the 4HEAT app. If you do not remember the credentials of the account you entered in the 4HEAT app you can view them by going to settings. “HOME PAGE”
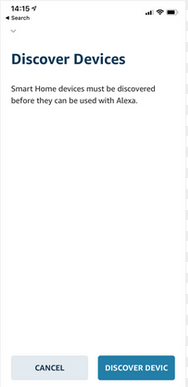
After logging in, the page showing the connection between 4HEATModule and Alexa is displayed. At this point, the page is closed with an X in the top left-hand corner and you are then returned to the Alexa application where you are asked to find new devices.
|
|
You can only change the room thermostat if it is set on your heating system. |
Clicking on Discover Devices will search for 4HEATModule configured devices. At the end of the search the number of found devices is displayed.
 |
 |
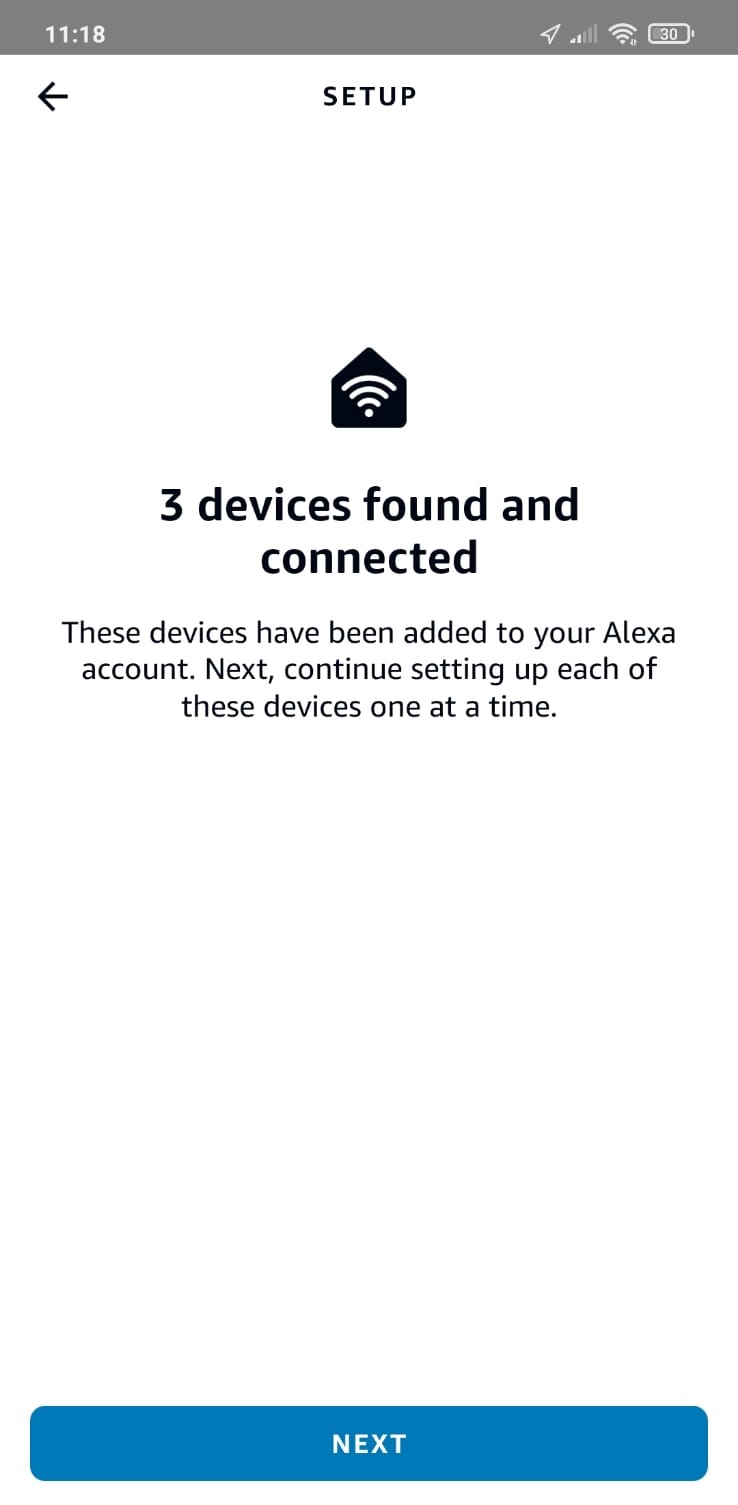 |
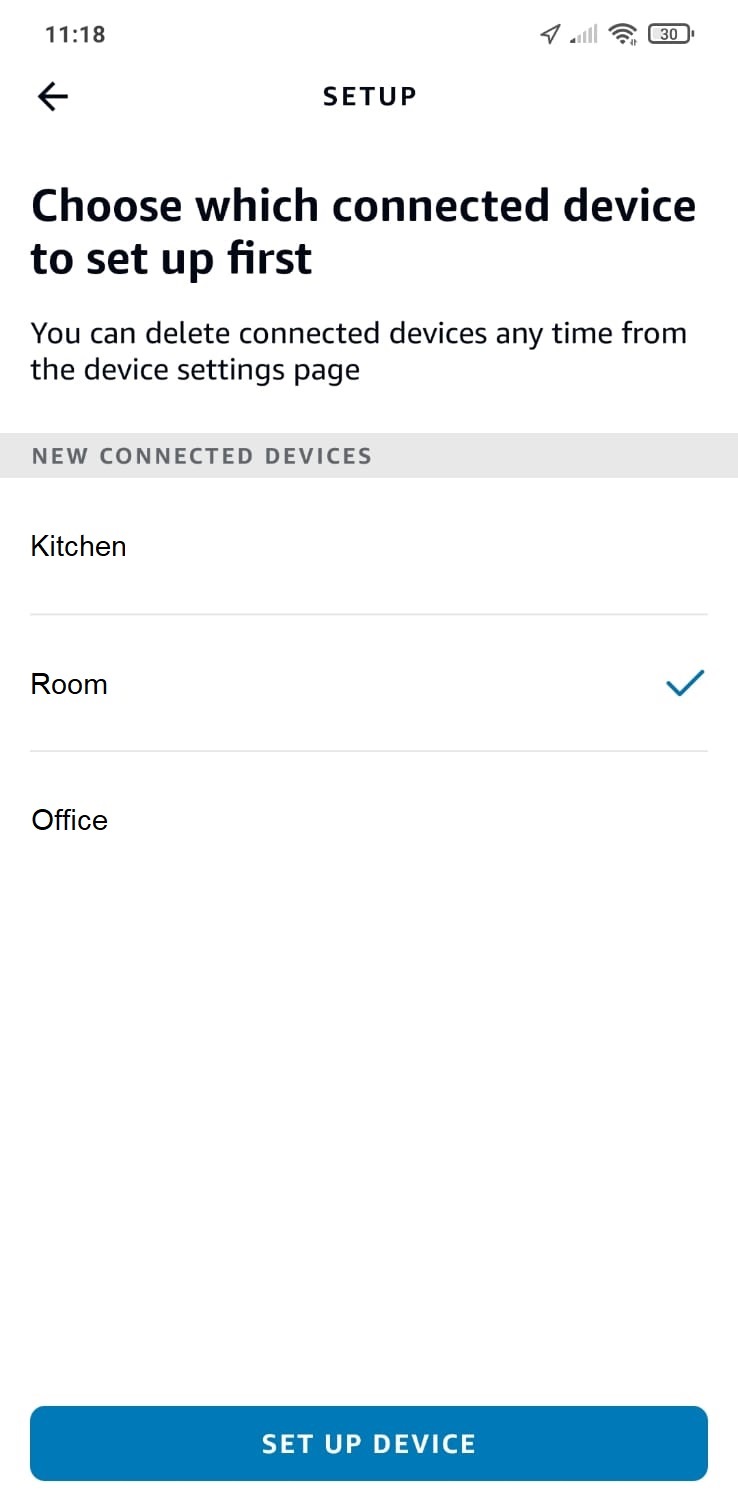
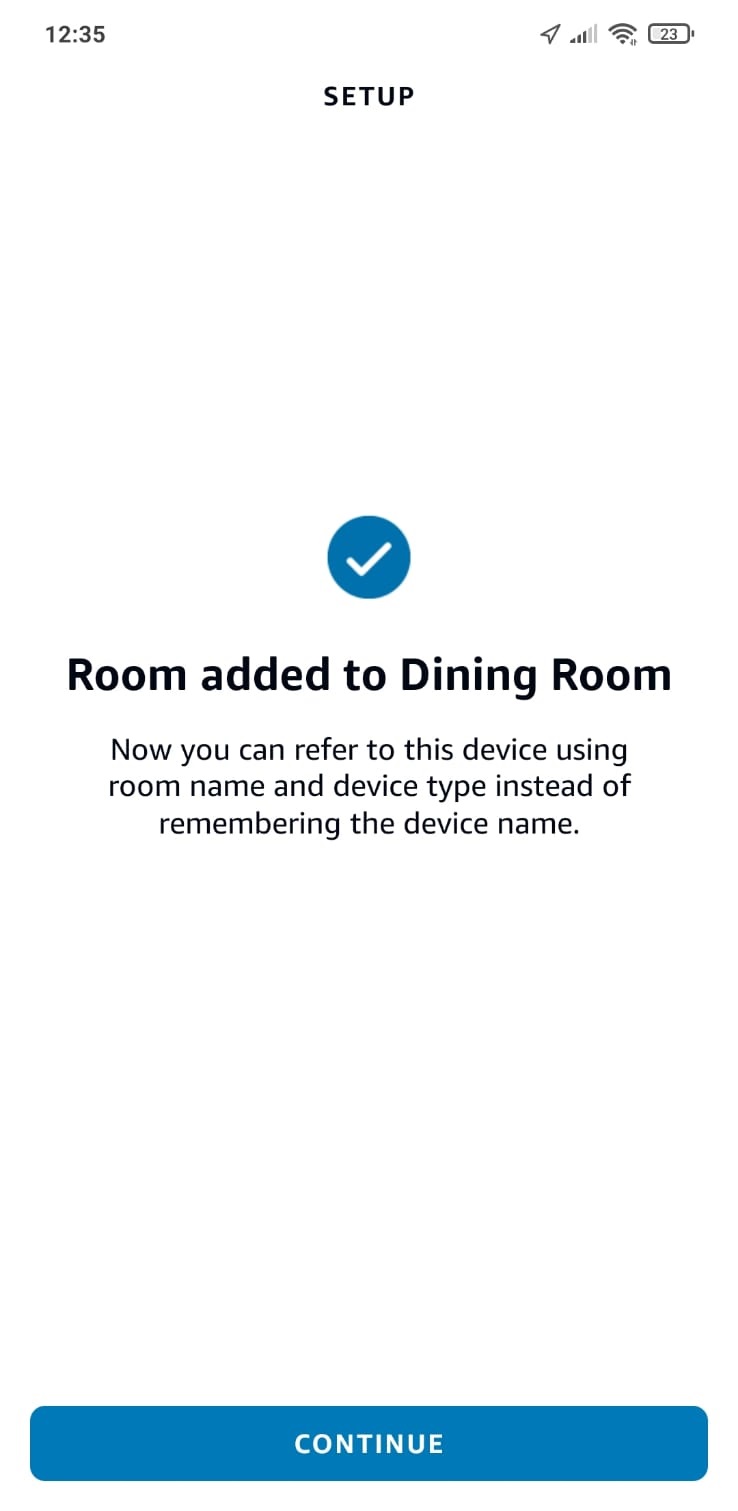
Clicking on SELECT DEVICE, a list of connected devices is displayed, select the device and click on DEVICE CONFIGURATION, you are asked if you want to add the selected device to a group, otherwise you can skip the procedure.
 |
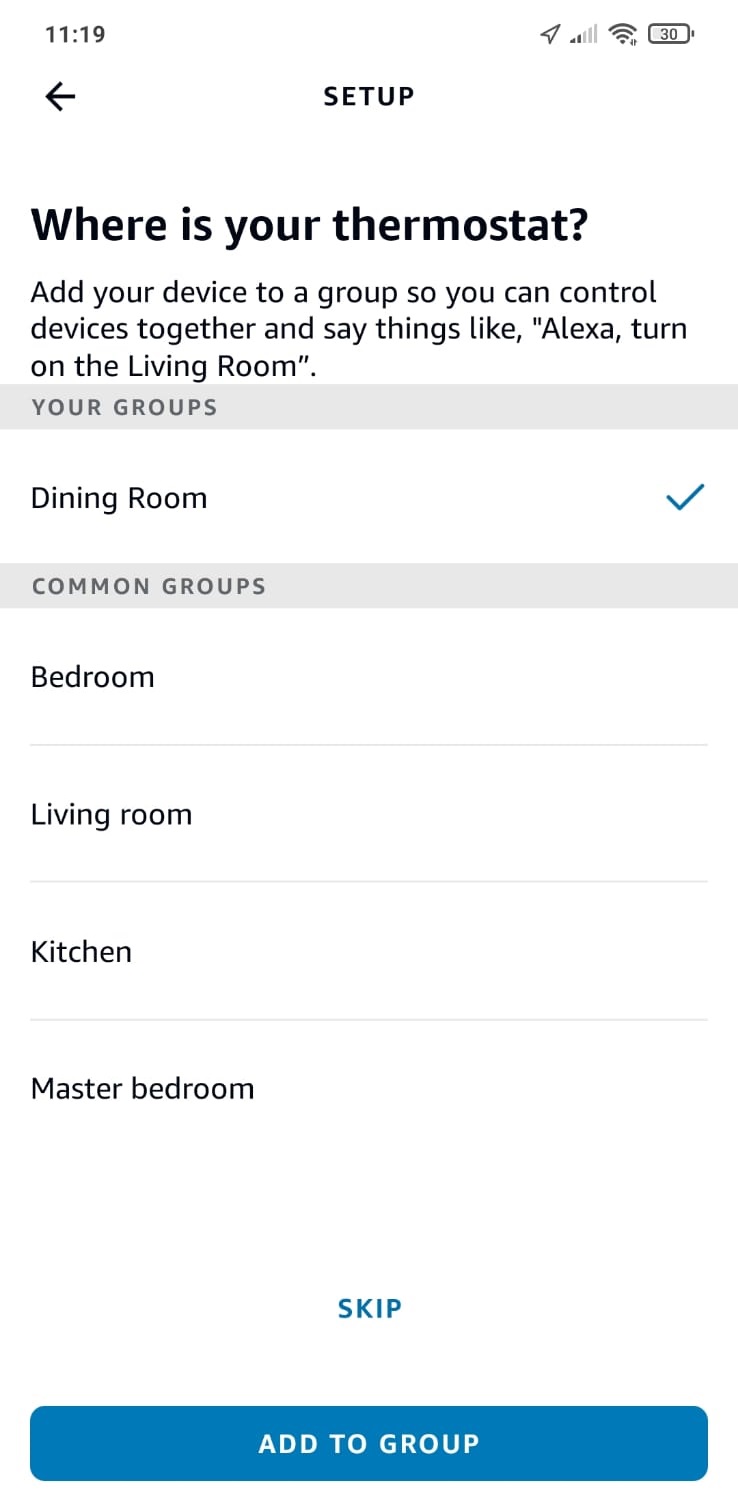 |
If you click on SELECT GROUP you will be asked which group you want to add the device to, selecting and clicking on ADD GROUP will confirm that the device has been added to the group and click on CONTINUE. The last step confirms the successful configuration of the device 4HEATModule and you can now use it with Alexa.
 |
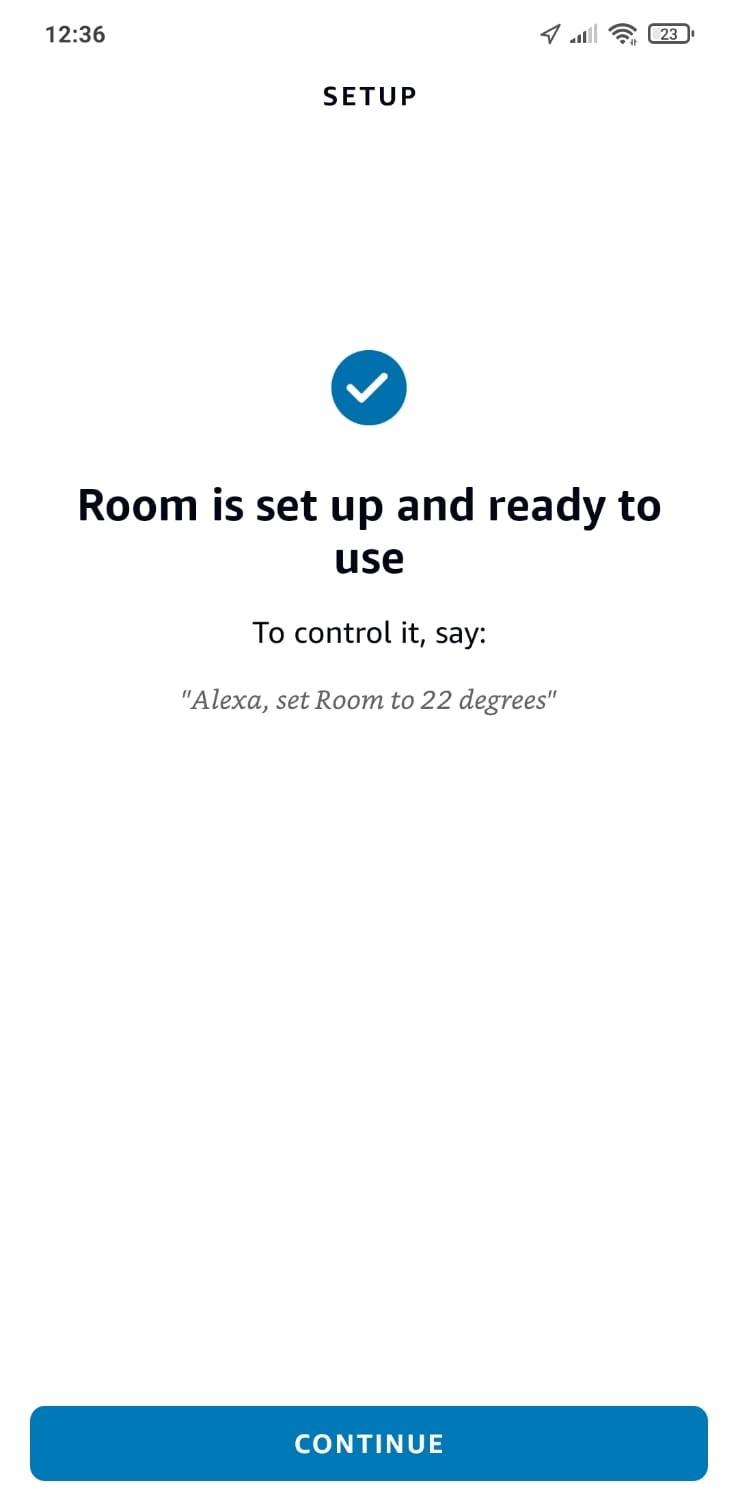 |
By adding the 4HEATModule to a group, you can ask Alexa to send a command to the device with the name of the group it is associated with, instead of saying the name of the 4HEATModule device set in your application 4HEAT. (E.g.: “Alexa, turn on Dining Room”).
If you click on SKIP a message is displayed confirming that the device has been successfully configured. This means that the device is not associated with any group, but you can always add it to a group at a later date.
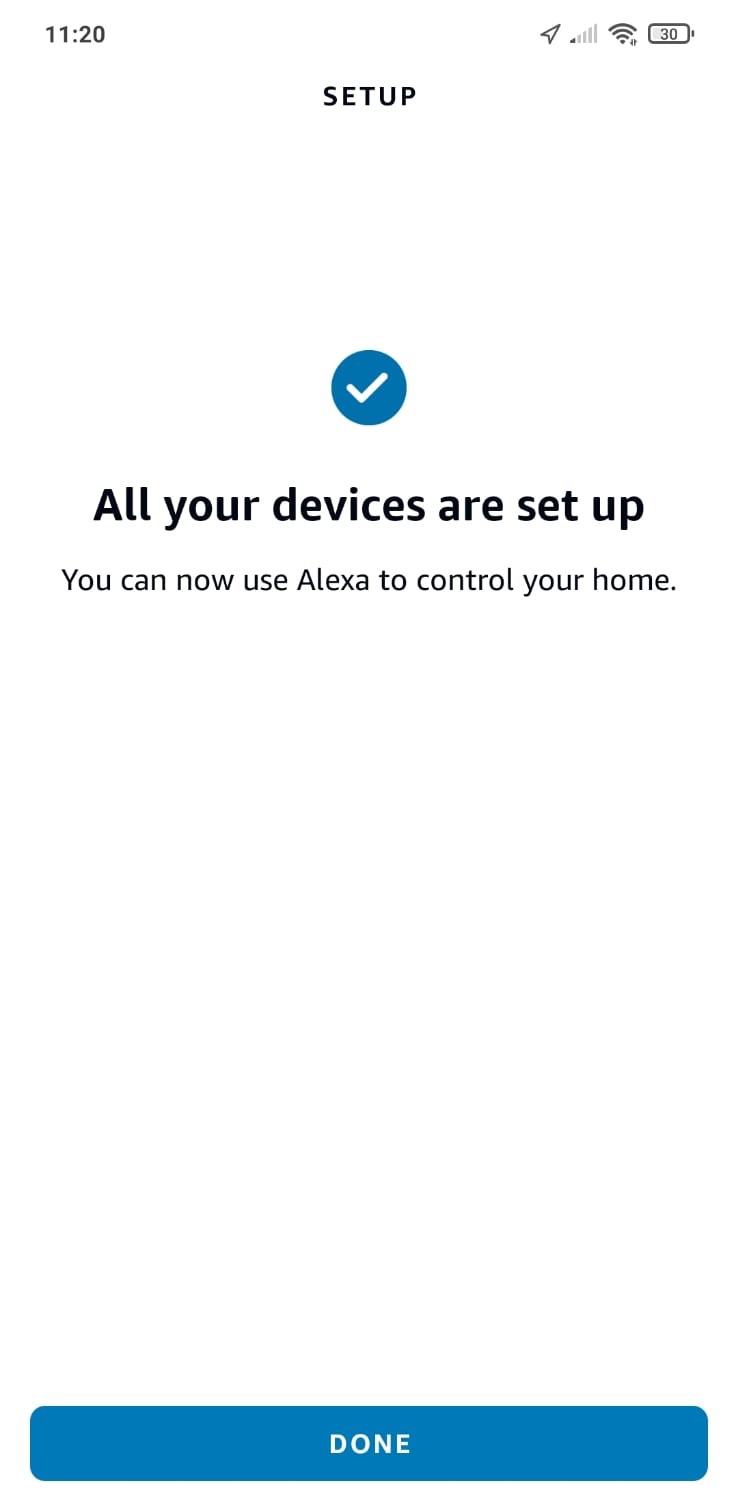
At the end of the device configuration you will see the message that the devices detected at the beginning of the configuration have been added, click on DONE.
COMMANDS
After the configuration procedure, it is possible to communicate with the 4HEATModule. With Alexa it is possible to change or read the set temperature of the room thermostat or to switch the heating system on and off with certain commands.
Commands you can ask Alexa for the 4HEATModule (Living Room is the name on the 4HEAT app):
- Alexa, is Living Room turned on?
- Alexa, is Living Room turned off?
- Alexa, turn off the Living Room
- Alexa, turn on the Living Room
- Alexa, what is the Living Room temperature?
- Alexa, how is Living Room set?
- Alexa, set the Living Room temperature to 30 degrees.
- Alexa, raise the temperature of the Living Room
- Alexa, lower the temperature of Living Room
- Alexa, what is the Living Room set temperature?
|
|
When the lowering and raising command is used, the temperature is increased or decreased by 2 degrees. |
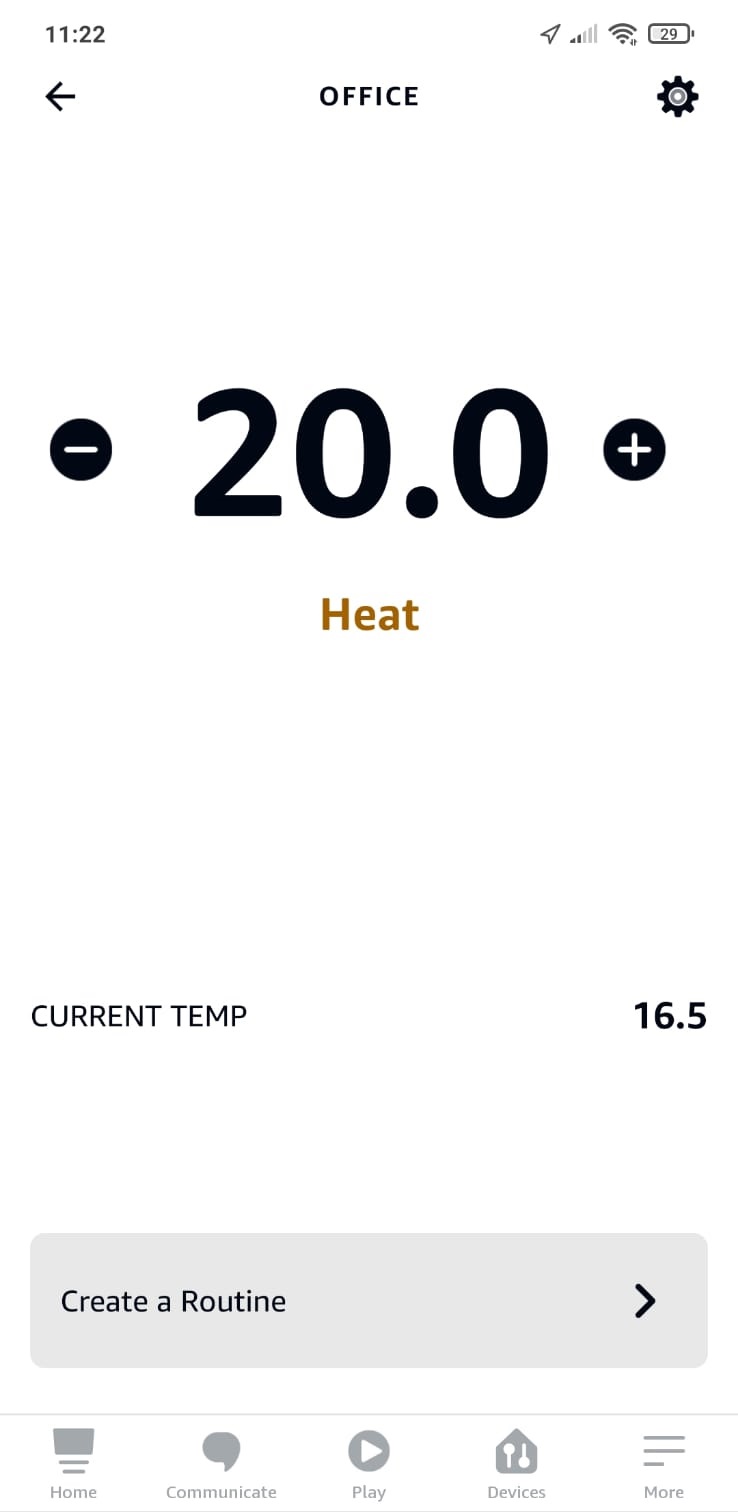
You can perform the same voice commands from the application by going to Devices →Thermostats here you will find the list of devices that have been configured there and you can turn the device on and off and set the thermostat temperature.
To switch the heating system on or off, simply click on ON or OFF in the device list. It is also possible to turn all devices on or off at the same time by using the ON or OFF button above all devices.
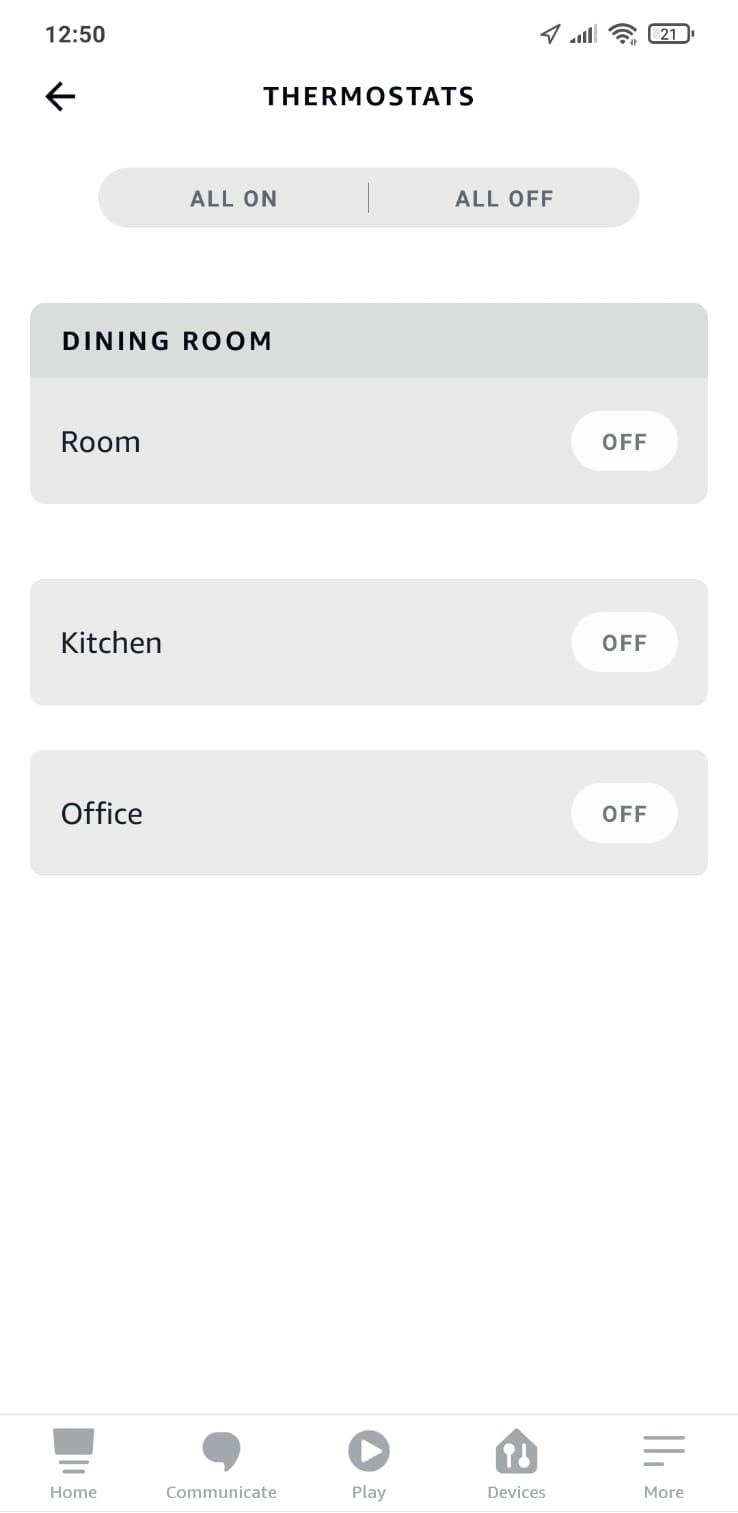
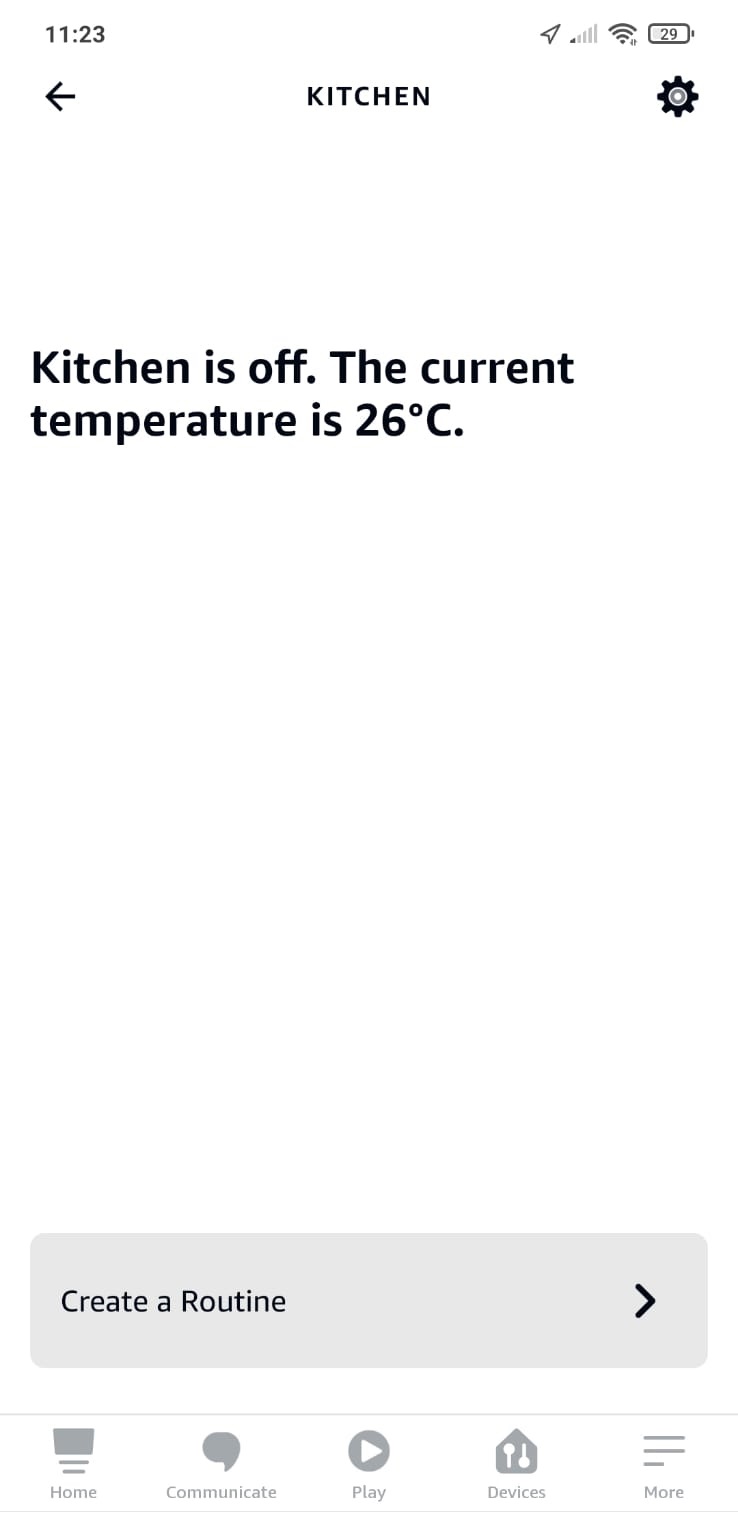
To set the temperature of the room thermostat it is necessary that the heating system is switched on or, if the heating system is switched off or the current temperature is displayed.
 |
 |
|
Stove On |
Stove Off |
ROUTINES
The routines allow you to manage the operation of 4HEATModule devices more quickly. Routines can be accessed either within the device or from the menu of the Alexa APP.
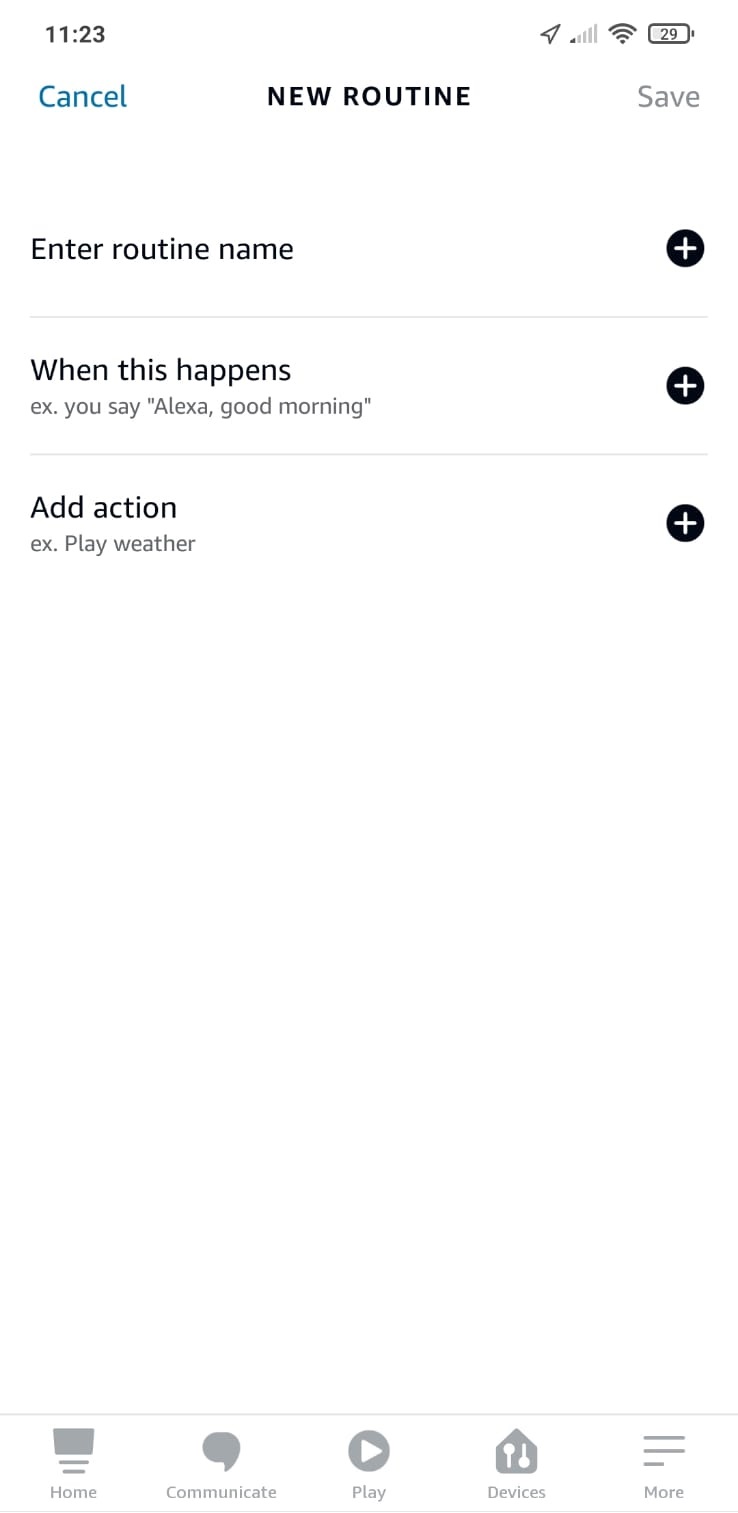
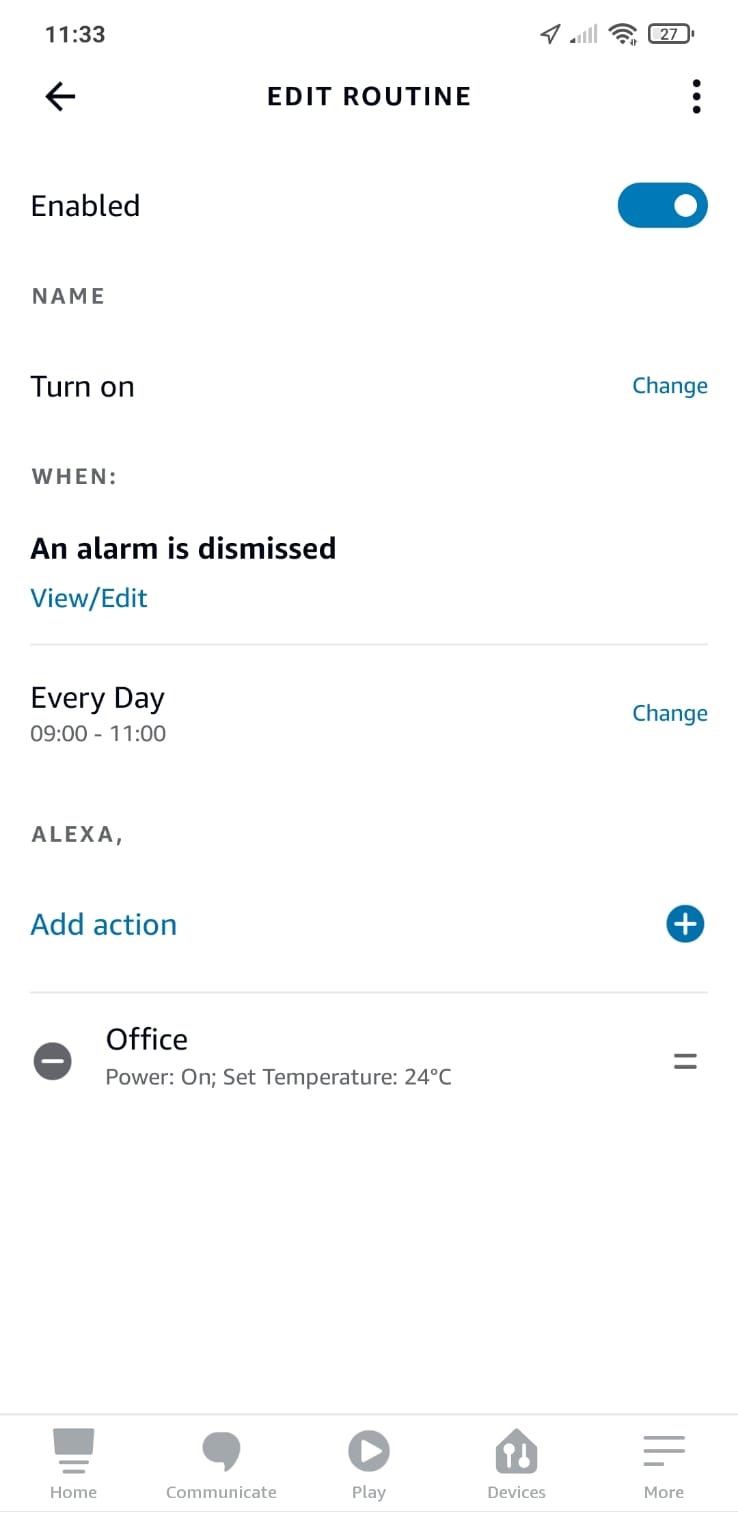
To create a routine click on CREATE A ROUTINE on the device screen, then click on plus to start creating your own routine.
If, on the other hand, you access Menu→ Routine then click on the plus button to create a new routine.
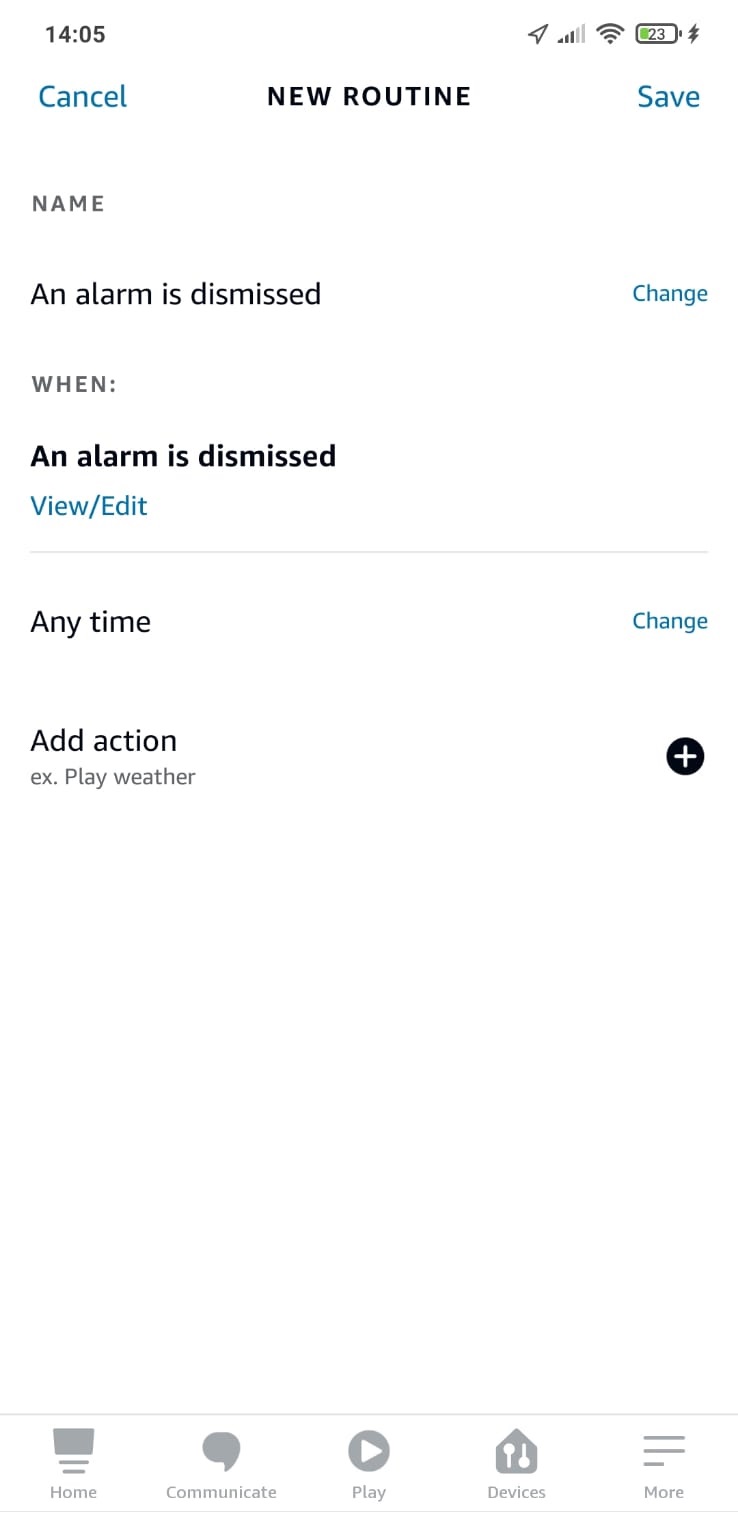
When creating a new routine, it must be entered:
- name identifying the routine;
- WHEN THIS HAPPENS, which event activates the routine;
- what is the action to perform.
 |
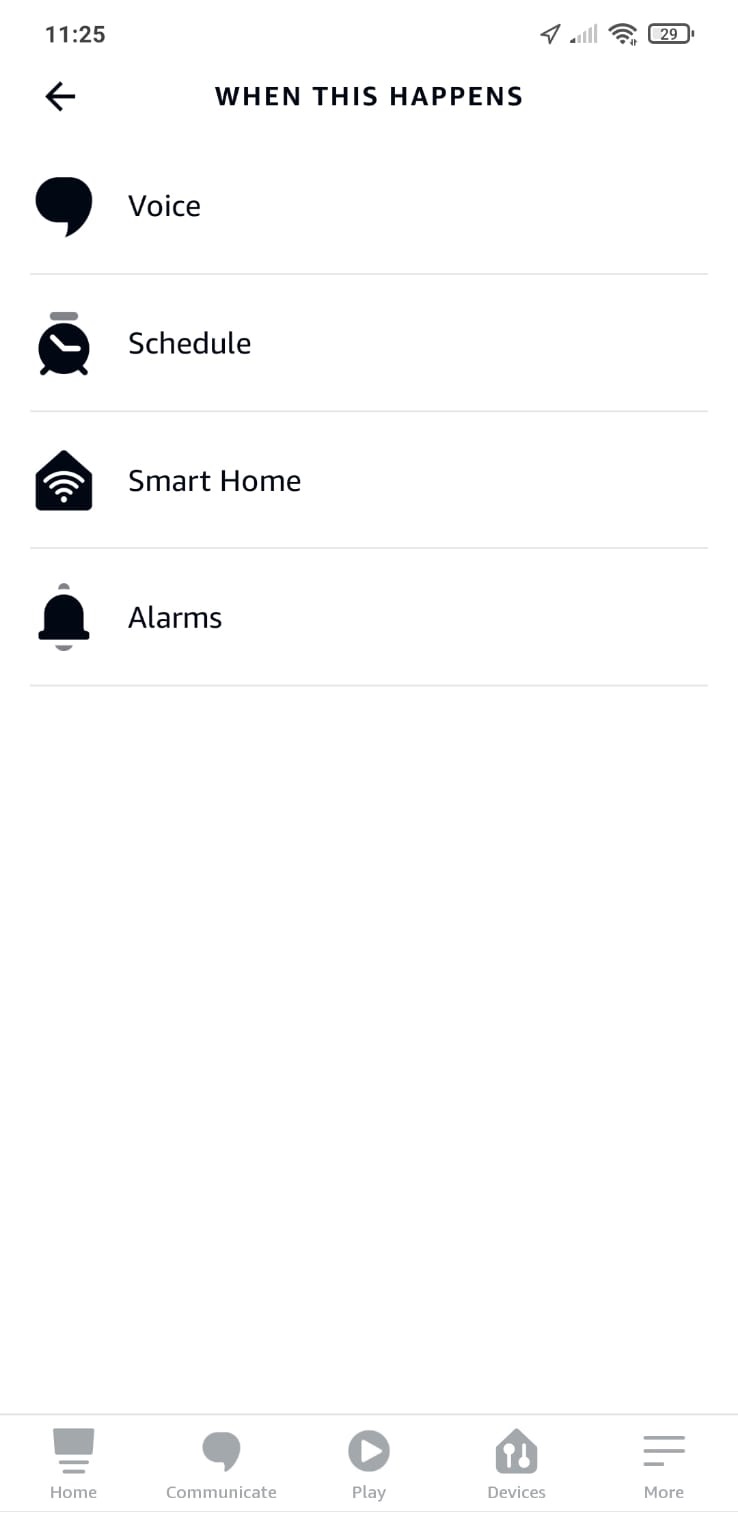 |
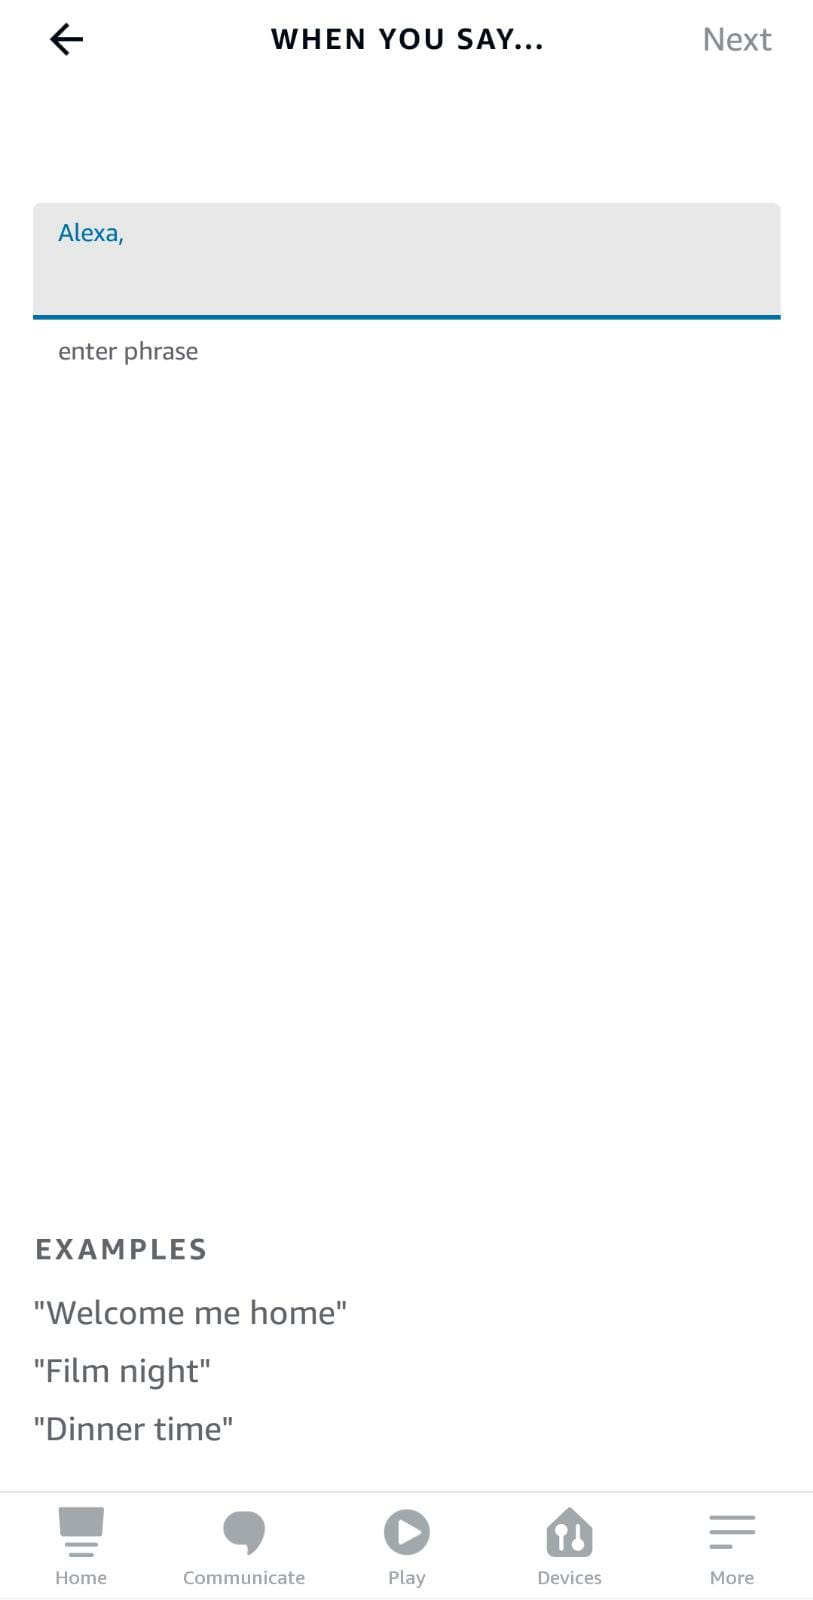
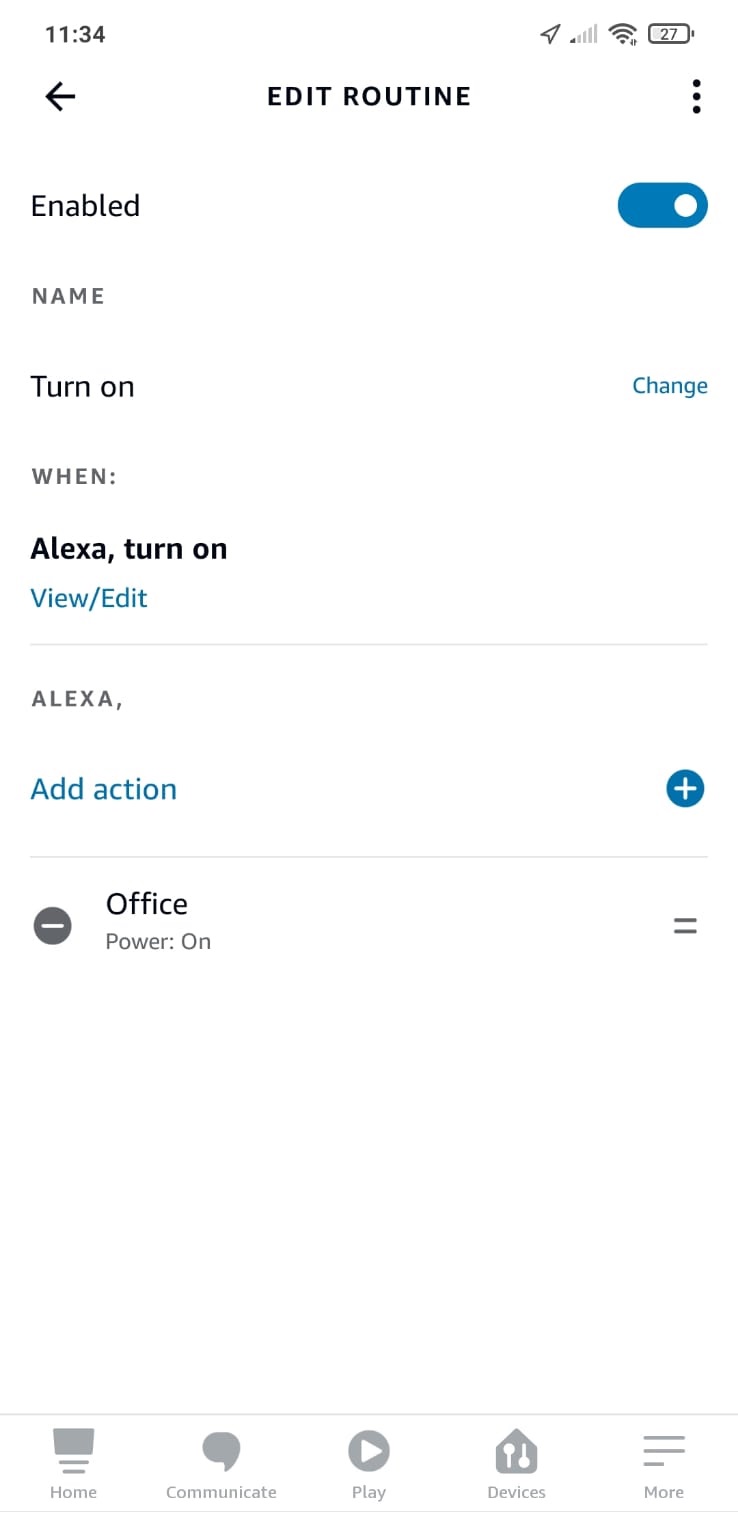
- Voice: you are going to write a certain voice command in order to simplify the commands already set to address Alexa. This does not mean that you delete or change the voice command that manages the devices, but you can use both to perform that particular action.
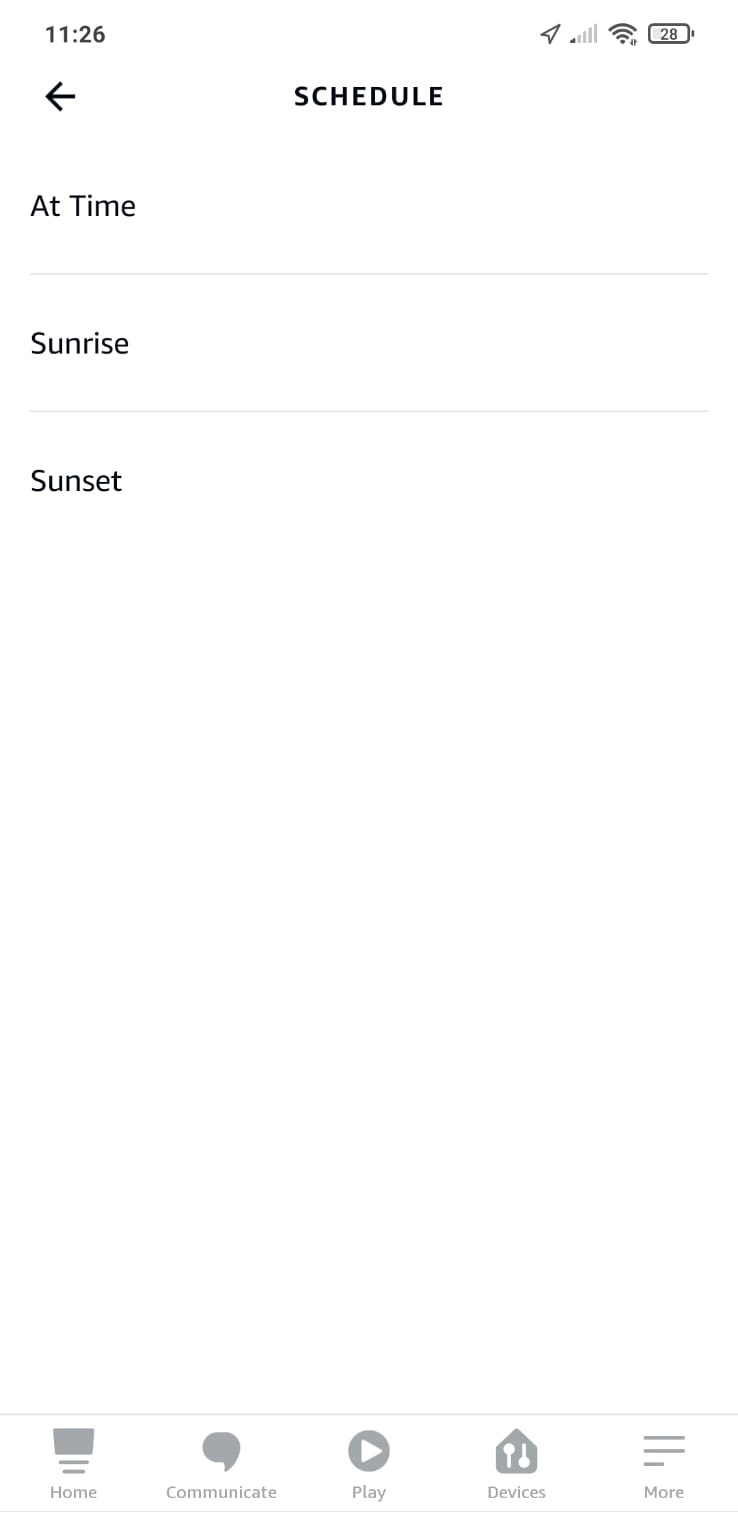
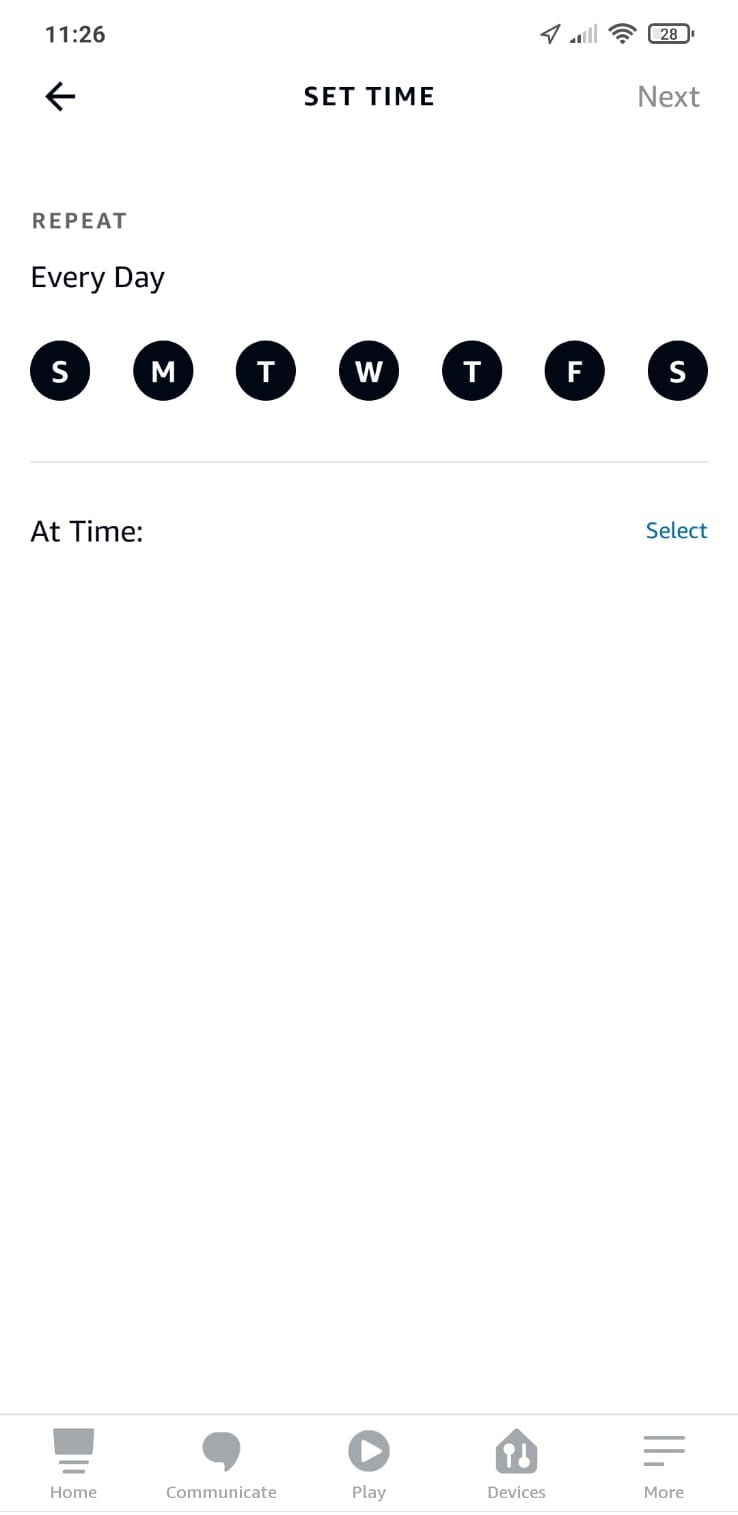
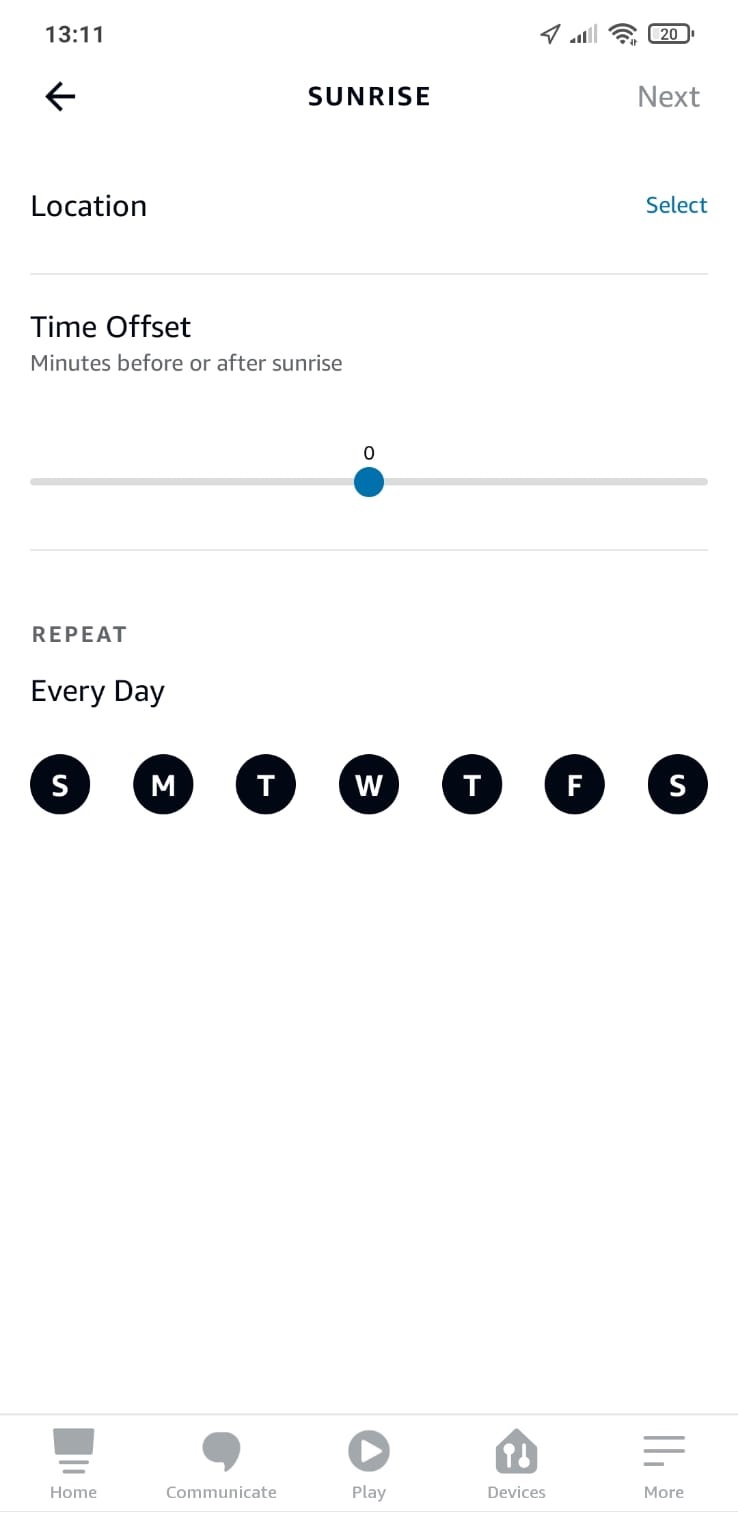
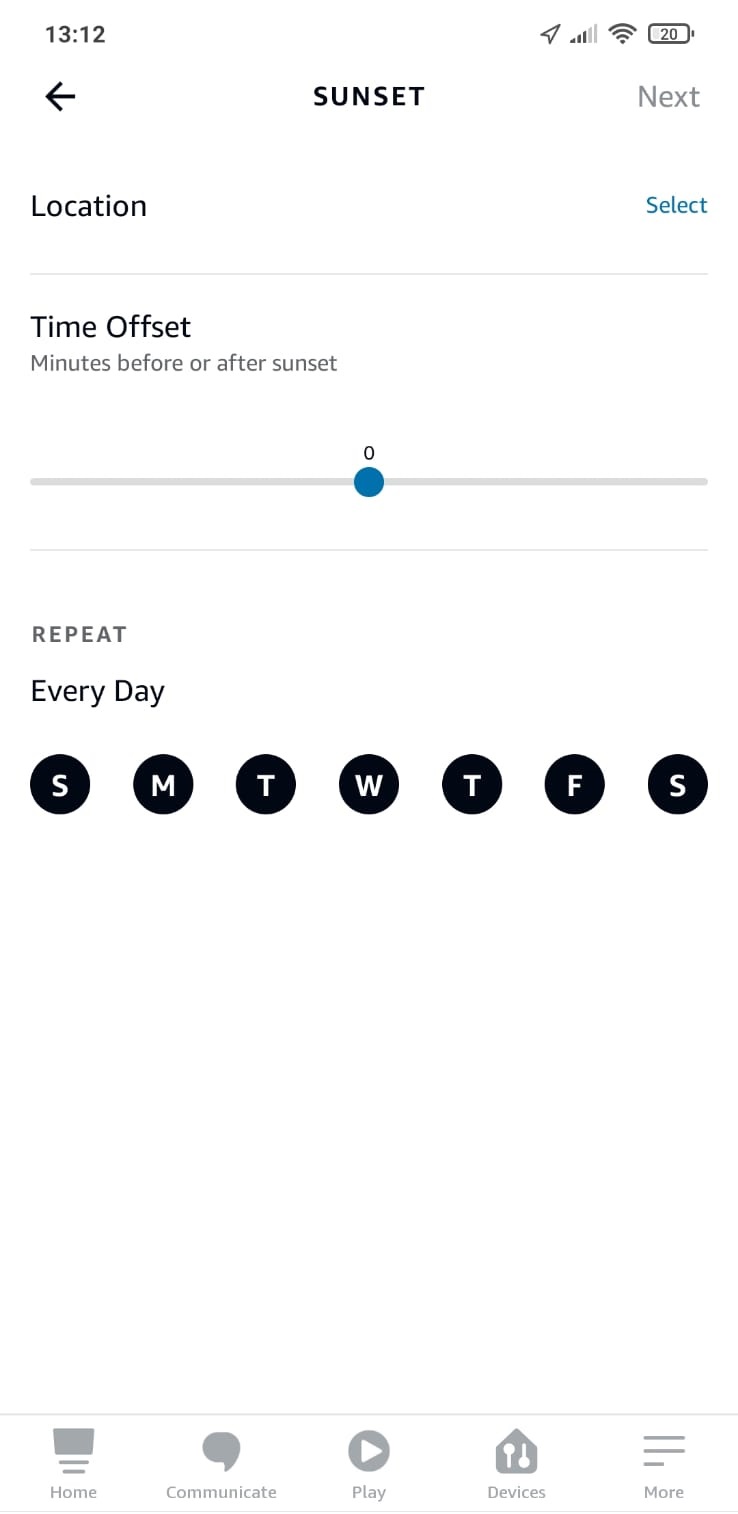
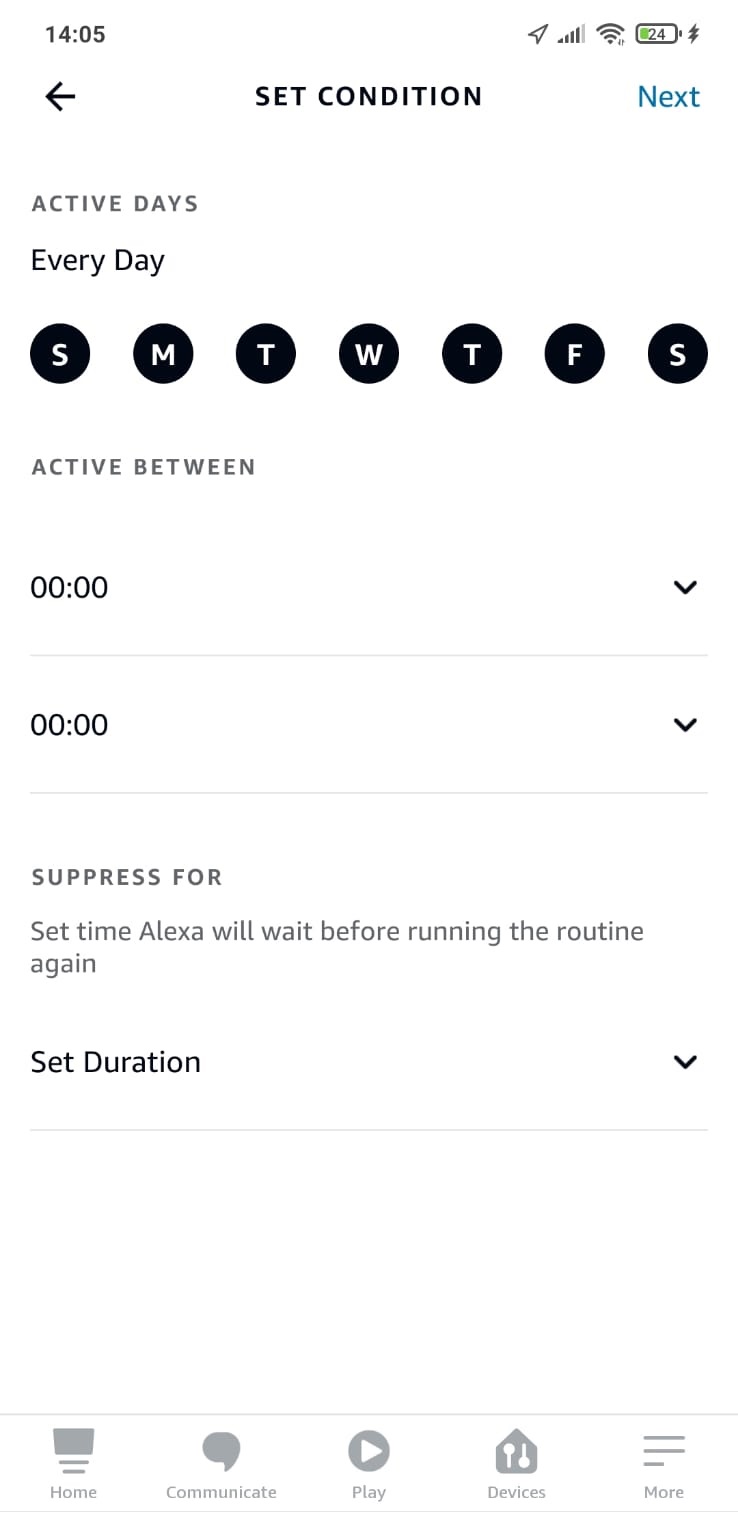
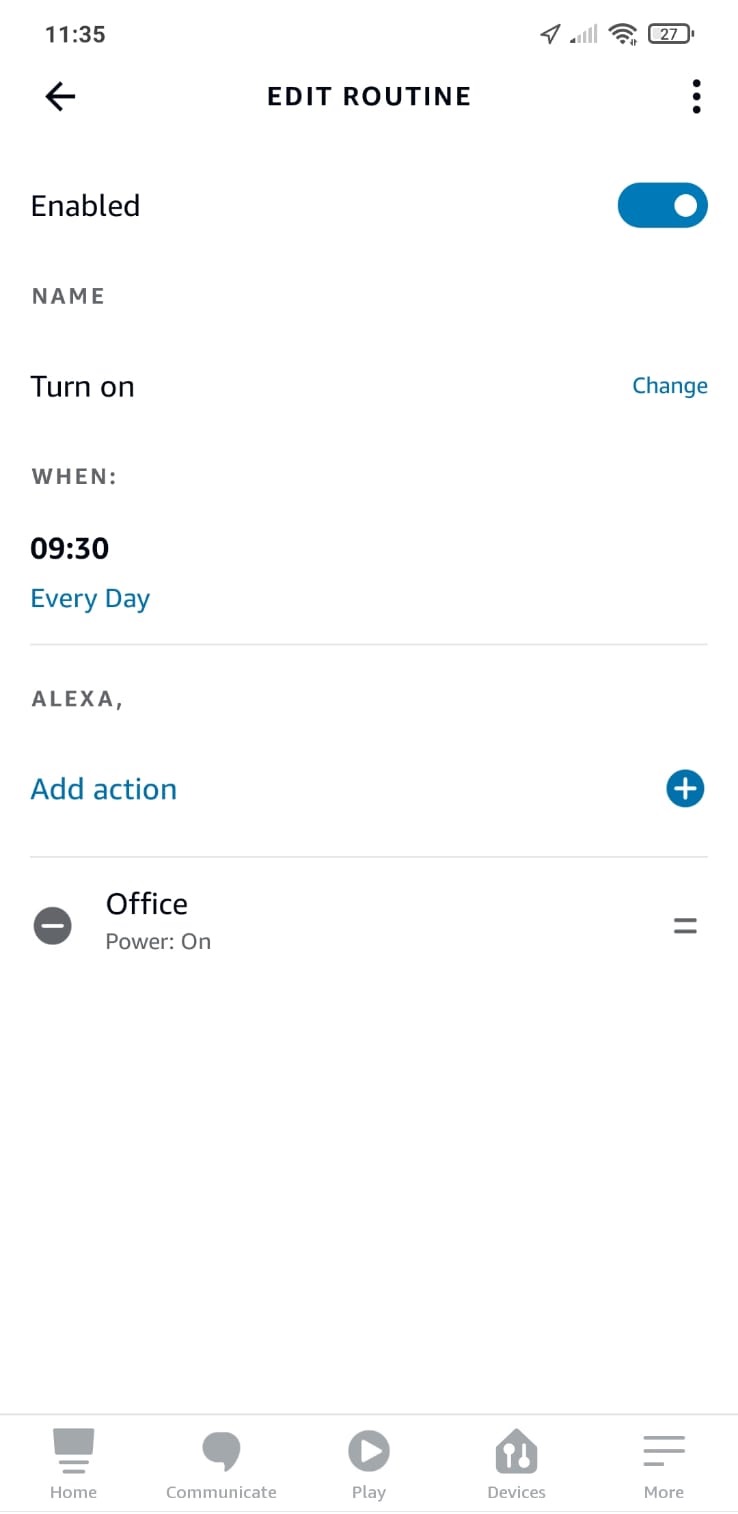
- Schedule: you can set a specific time at which you want the action to take place. You can choose a specific time or you can choose programming at sunrise or sunset. You can also choose the days when you want this operation to be repeated.
- Smart House: it can be connected to other events triggered by other smart devices connected to Alexa.
- Alarm: you must have an alarm clock already enabled to use this Routine. If you don’t have an alarm clock enabled, ask Alexa to set an alarm, so the action will be performed every time the alarm sounds. If you have more than one alarm clock set, you must chang At any time and set TIME BETWEEN by selecting a start and end time that includes only and exclusively the alarm taken into account. Otherwise, the action will be repeated for all the alarms set.
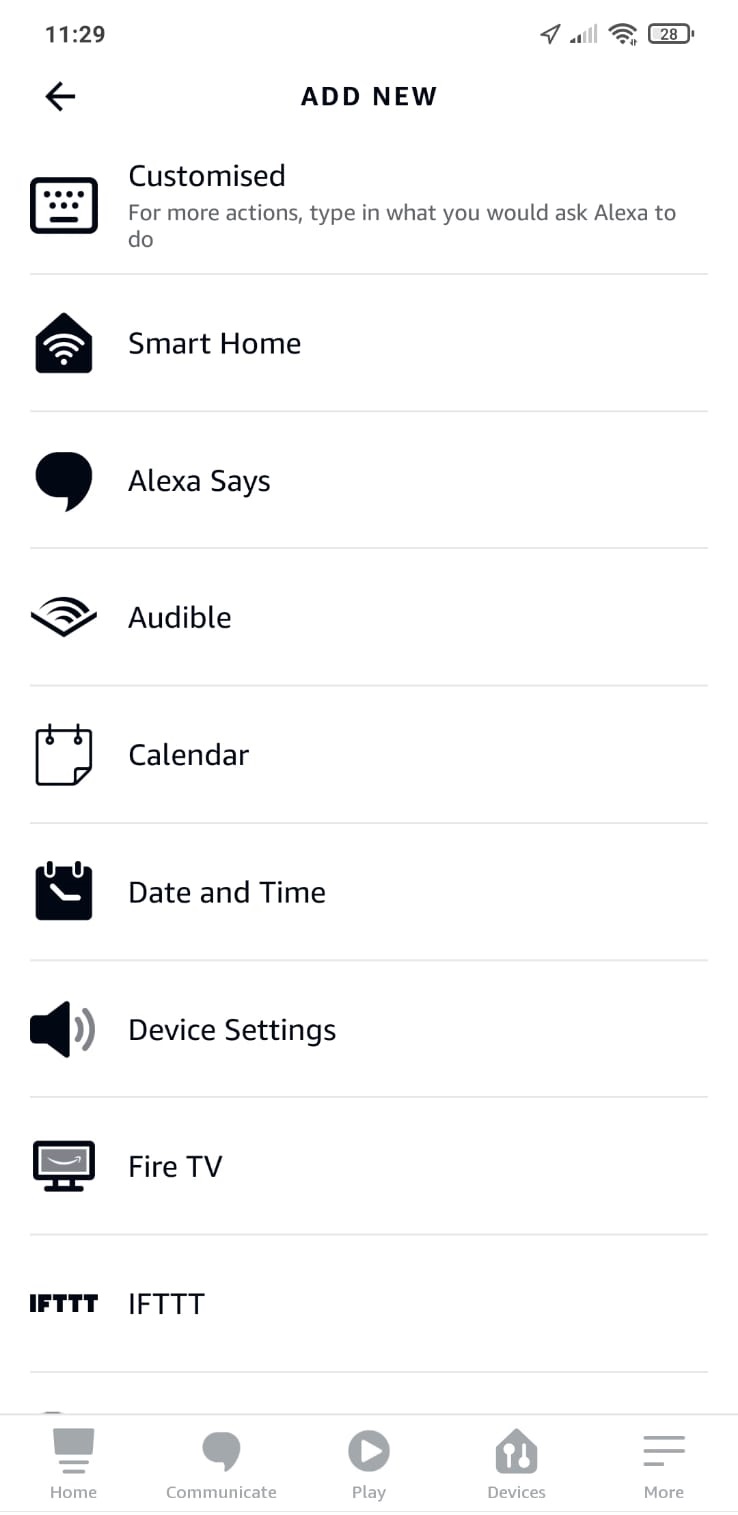
The third and final step after choosing one of the managements of When this happens is to add an action to end the Routine.
To add an action you must access to Smart House and select the affected 4HEATModule device, once this is done, you can choose the actions to take.
 |
 |
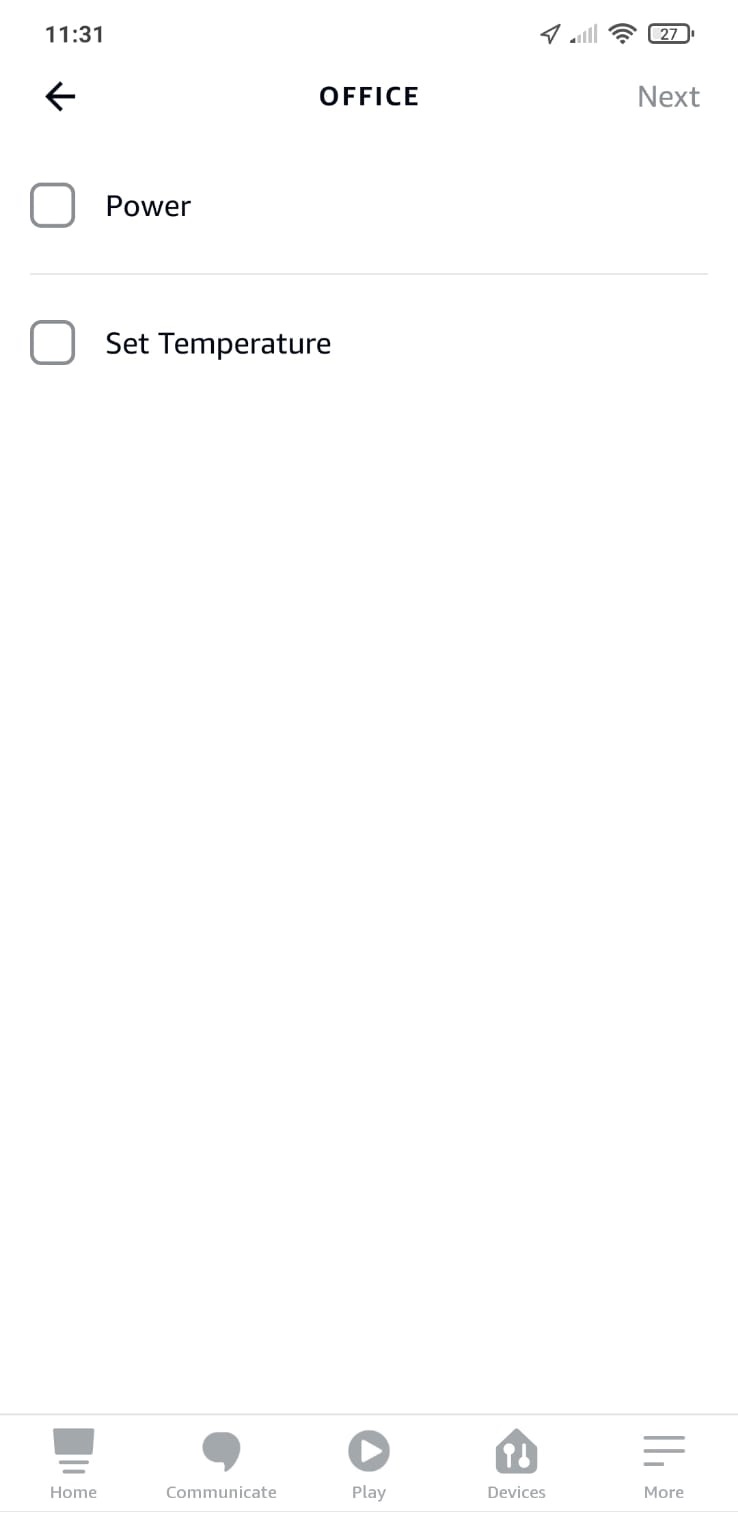
The action the 4HEATModule device can take are two, divided into Ignition and Set temperature. You can enable both actions or only one of the two, depending on your needs.
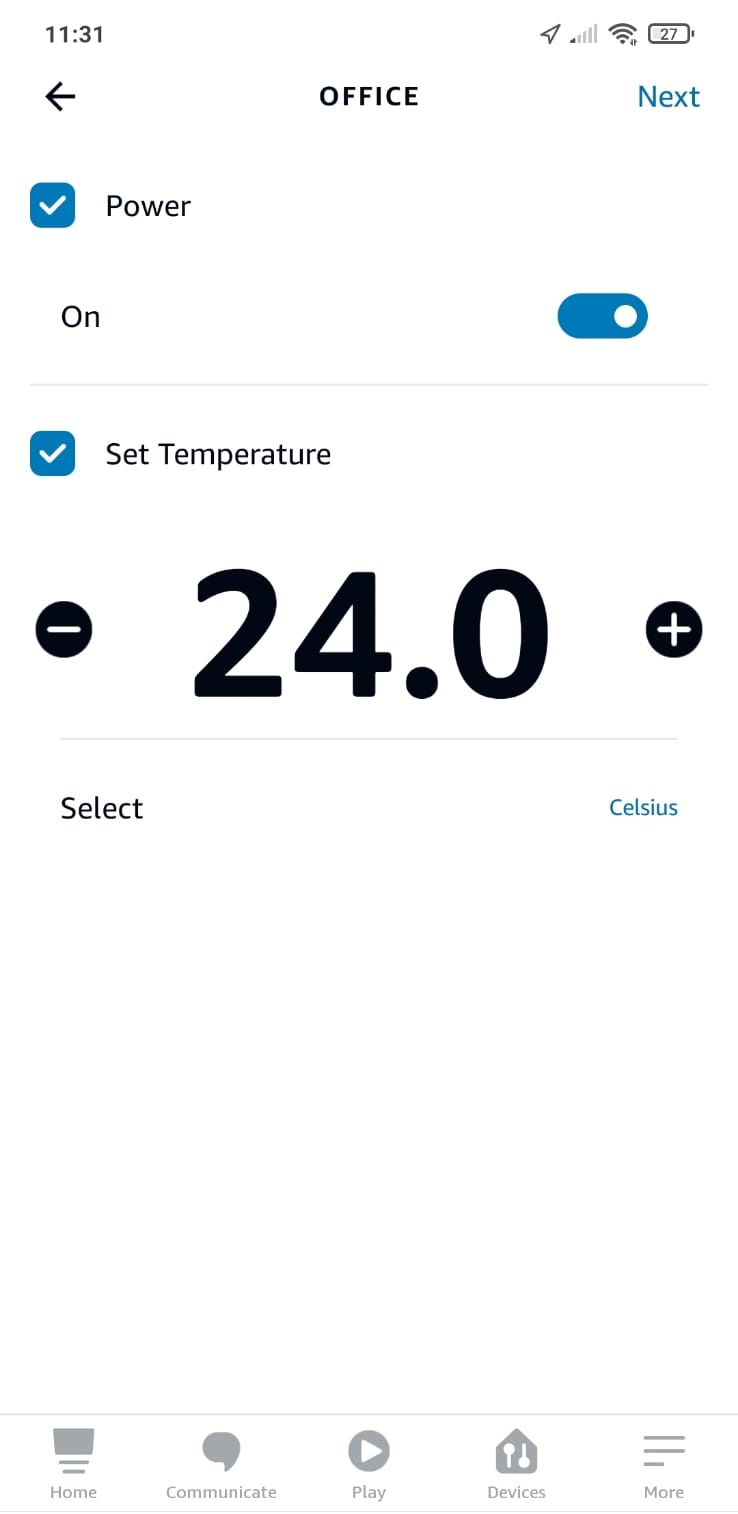
In Ignition you can choose whether to switch the heating system on or off by enabling or disabling the On or Off flag. This will happen when the Routine is complete.
In Set temperature, you can set the room thermostat temperature to a specific value, to choose manually, and it will be set on the 4HeatModule device when the Routine is completed. It is possible to change the temperature unit from Celsius to Fahrenheit.
 |
 |
It is also possible to add more than one action and assign other devices to the same routine as required.
When all fields are filled in, save and the routines screen will appear. You can create other routines, delete or modify existing ones, create more than one routine on a given device, you can also deactivate and activate routines created within them.
 |
 |
 |
|
Program Routine |
Vocie Routine |
Alarm Clock Routine |
15.2.GOOGLE HOME
SETTING
It is possible to manage the operation of the 4HEATModule device with Google Home. The 4HEATModule device must be configured under the same Wi-Fi network Google Home will be set. After you have set up everything, you can configure Google Home with the 4HEATModule.
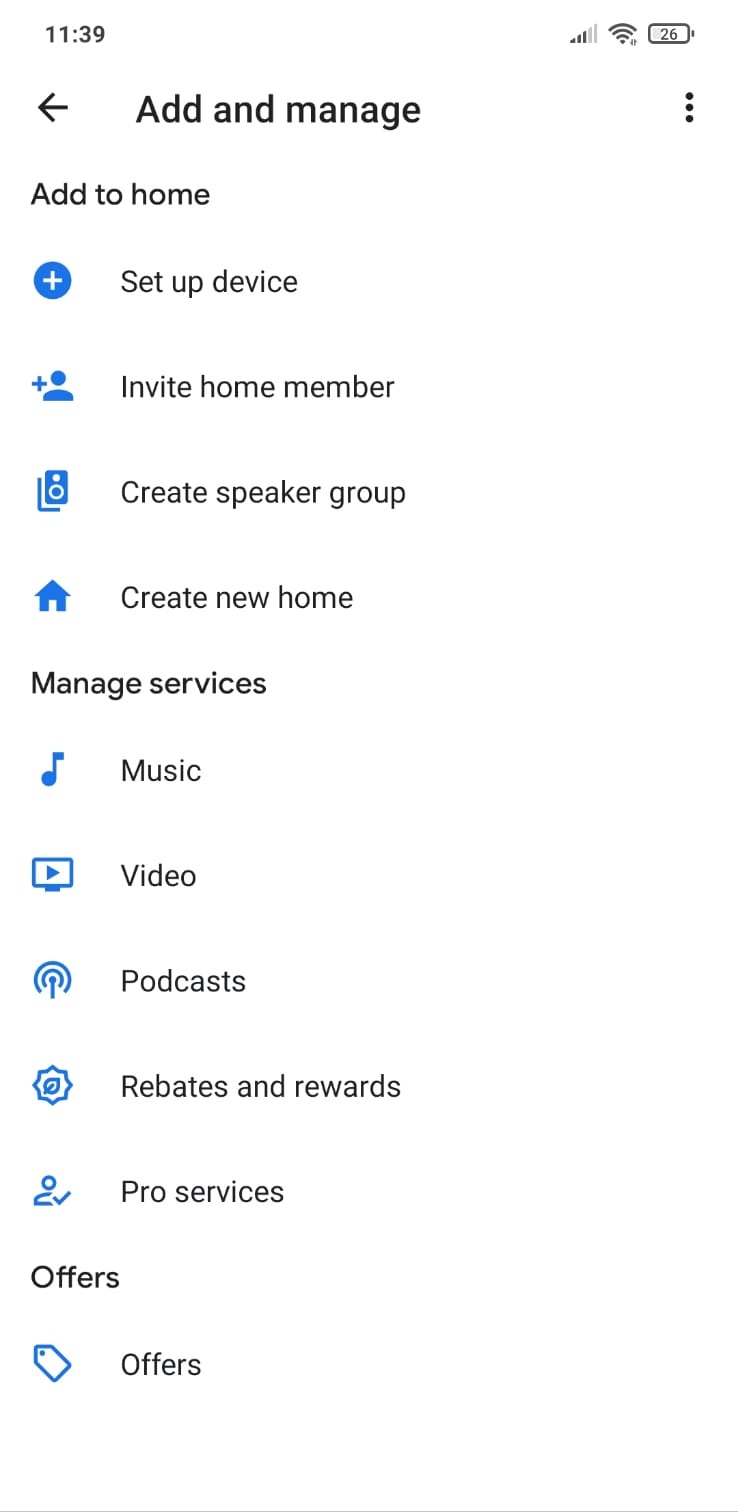
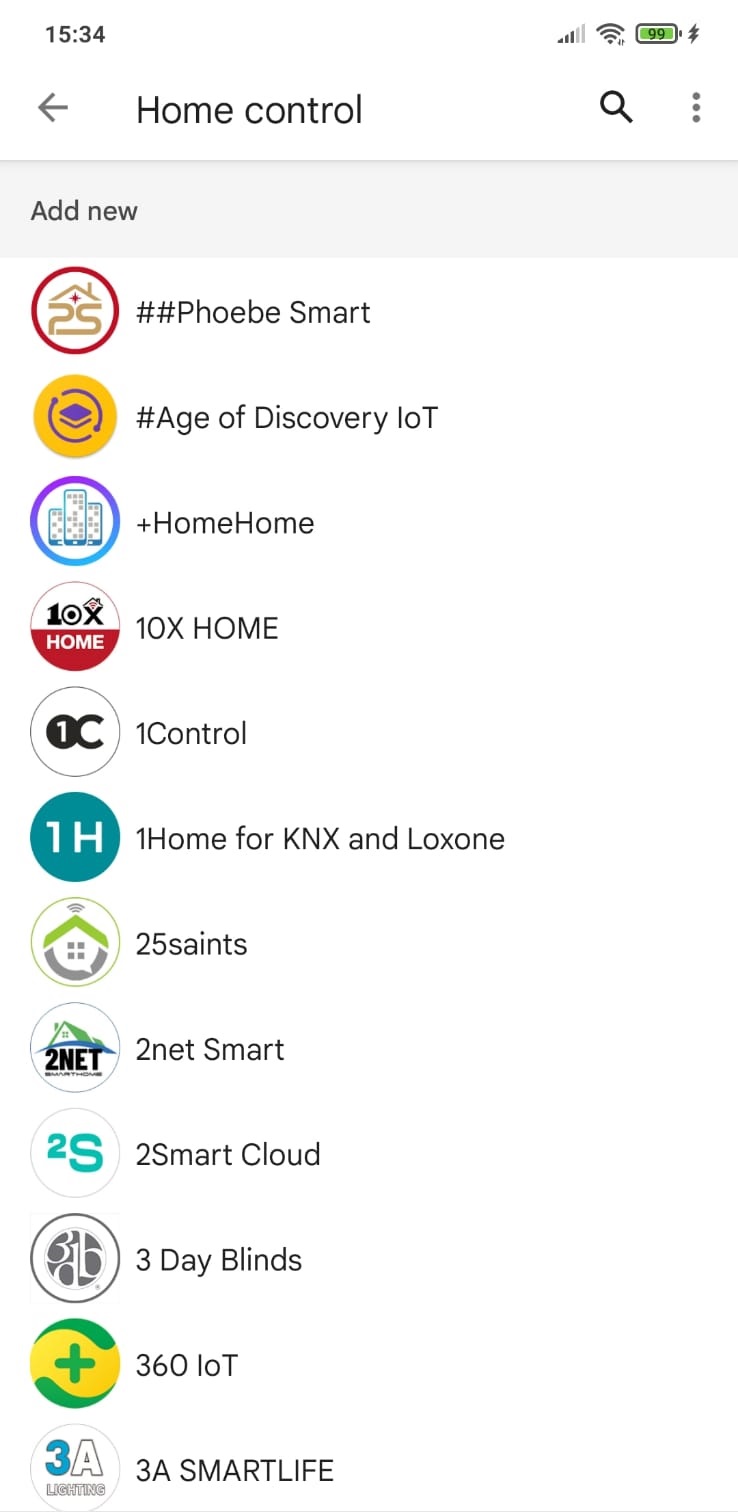
In order to operate the 4HEATModule with Google Home you need to download in Home Control “Smart Stove” to the Google Home application by clicking on plus the top left, press on Configure device. In Configure you must go to select “Did you configure anything yet?” then we are going to enter inthe search “Smart Stove” and click on it.
 |
 |
 |
 |
After accessing “Smart Stove” you are prompted to log in, you must enter the user and password that you use within the 4HEAT app. If you do not remember the credentials of the account you entered in the 4HEAT app you can view them by going to settings, “HOME PAGE“.
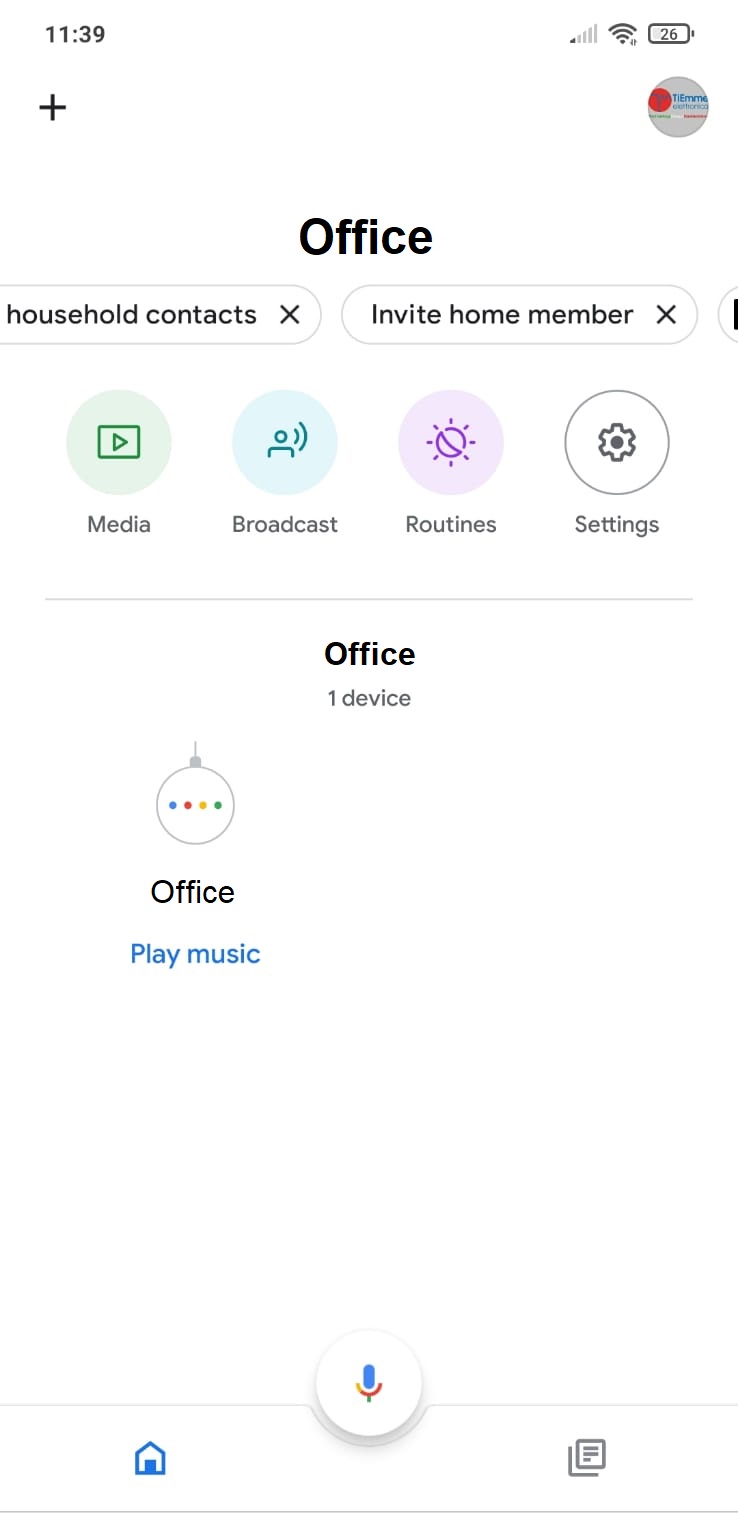
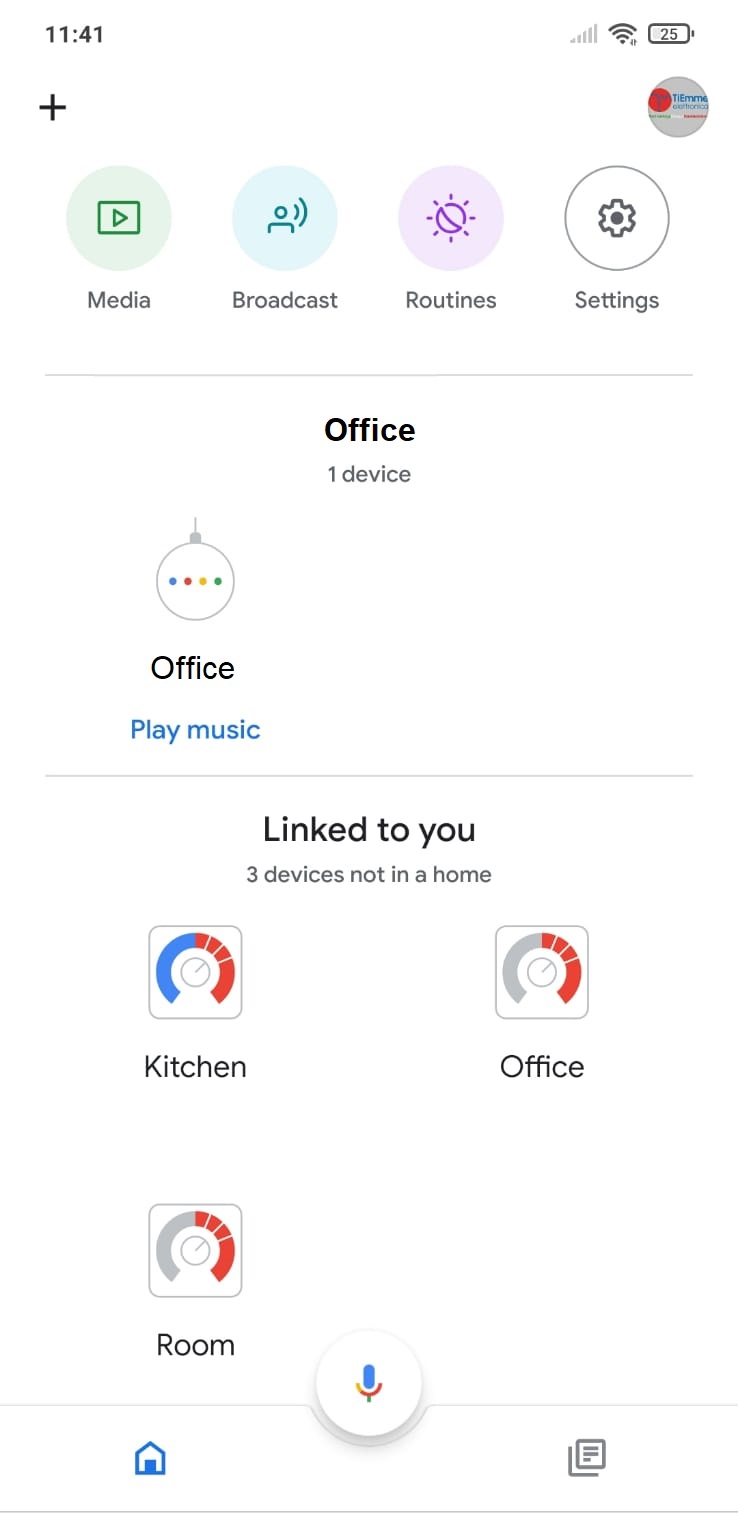
Once logged in, the account is linked. And back in the Google Home application main Home we will find our device.
|
|
You can only change the room thermostat if it is set on your heating system. However, you can always switch the heating system on and off. |
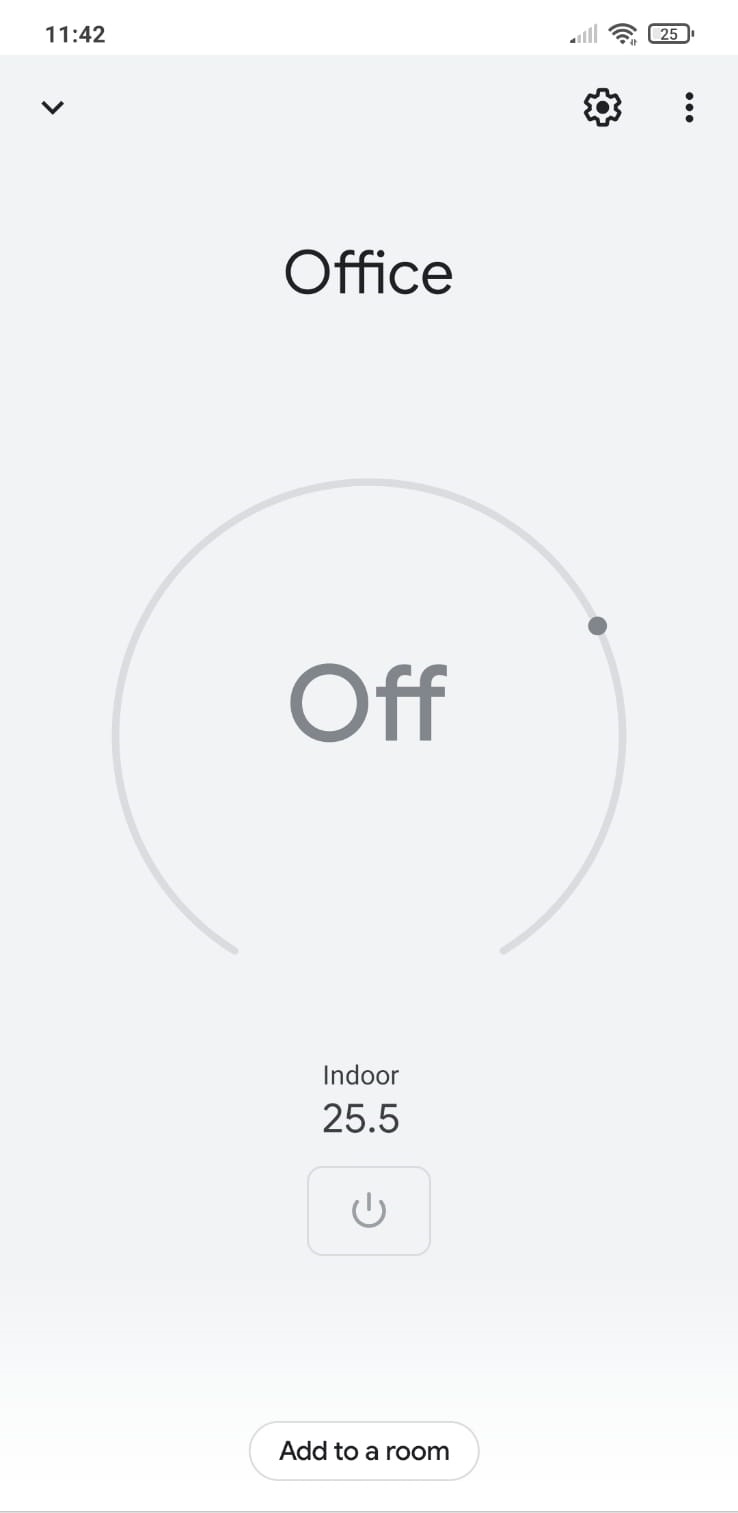
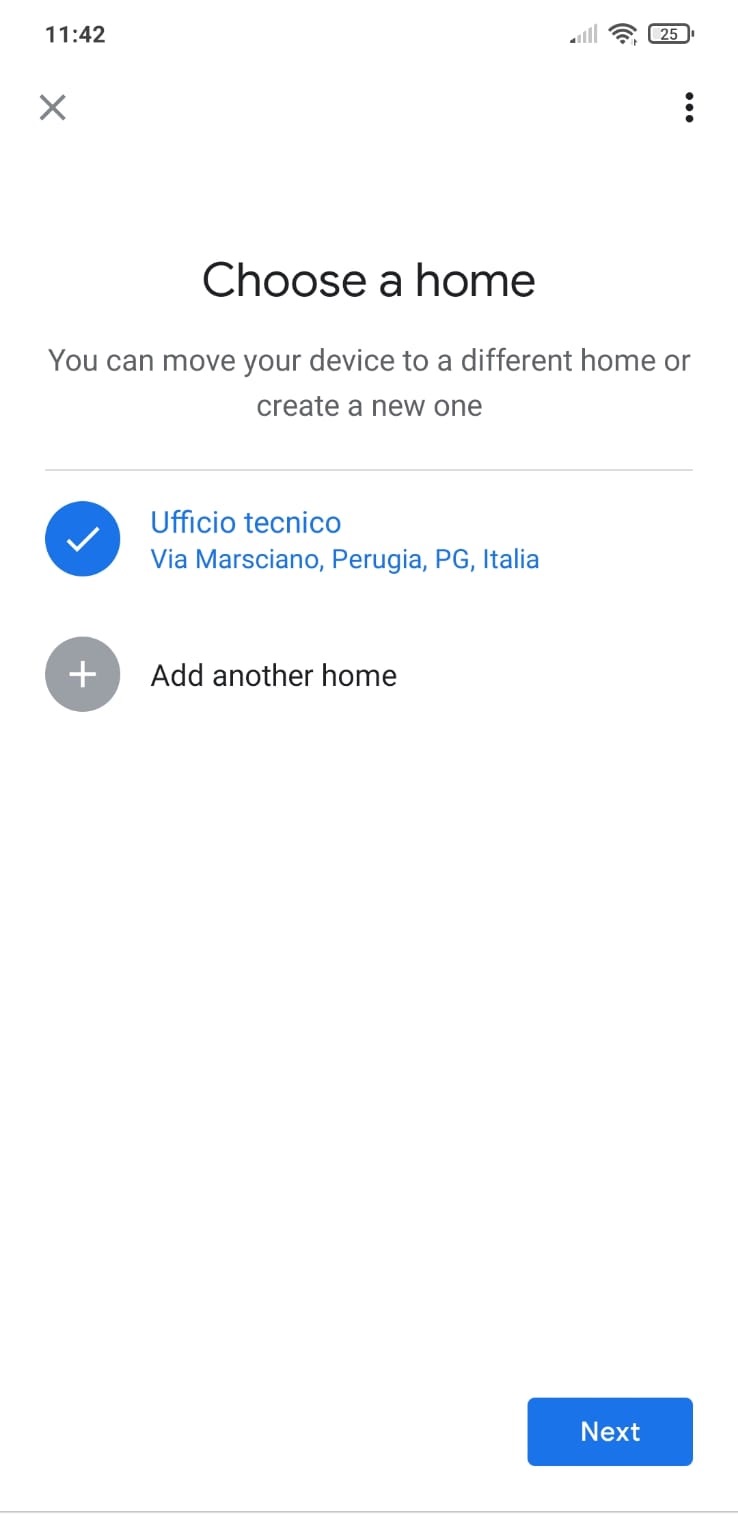
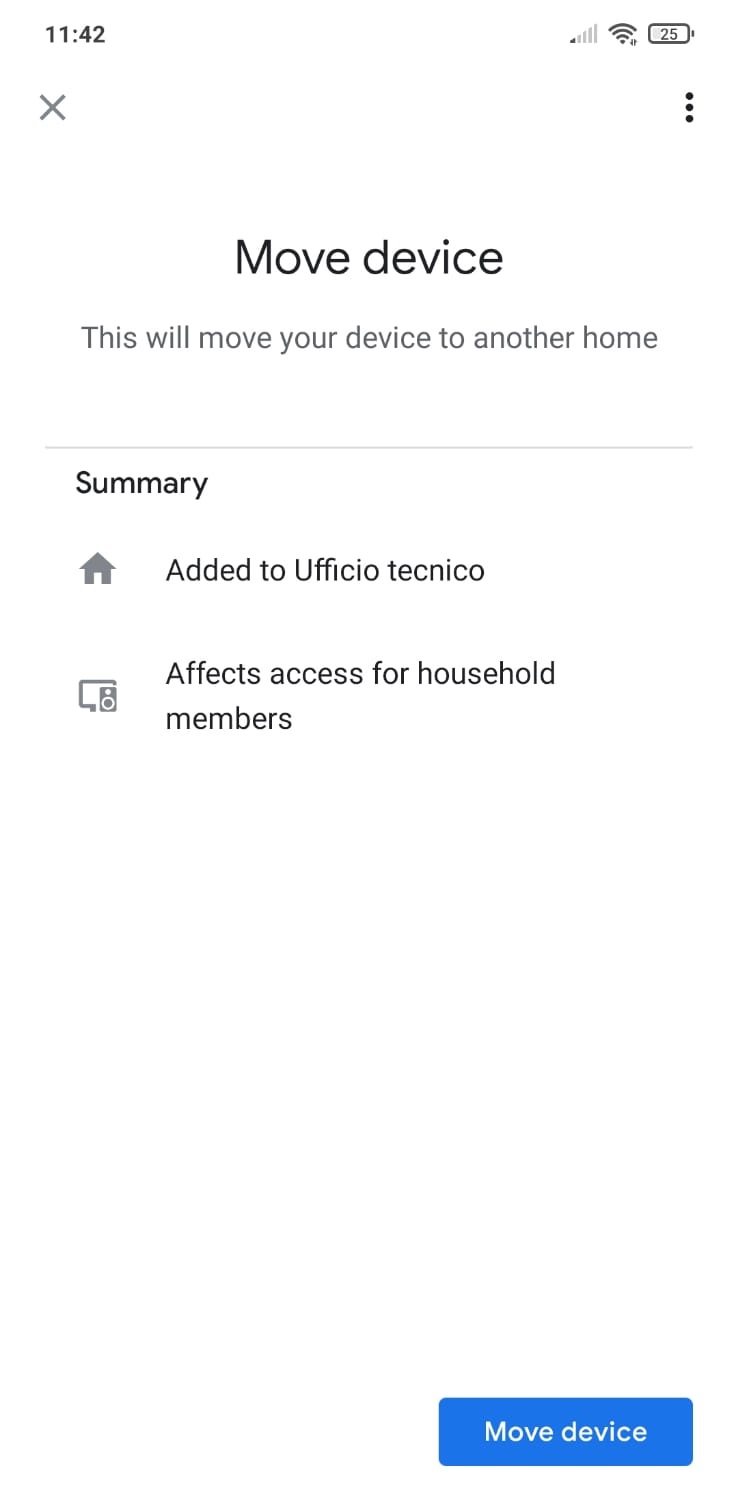
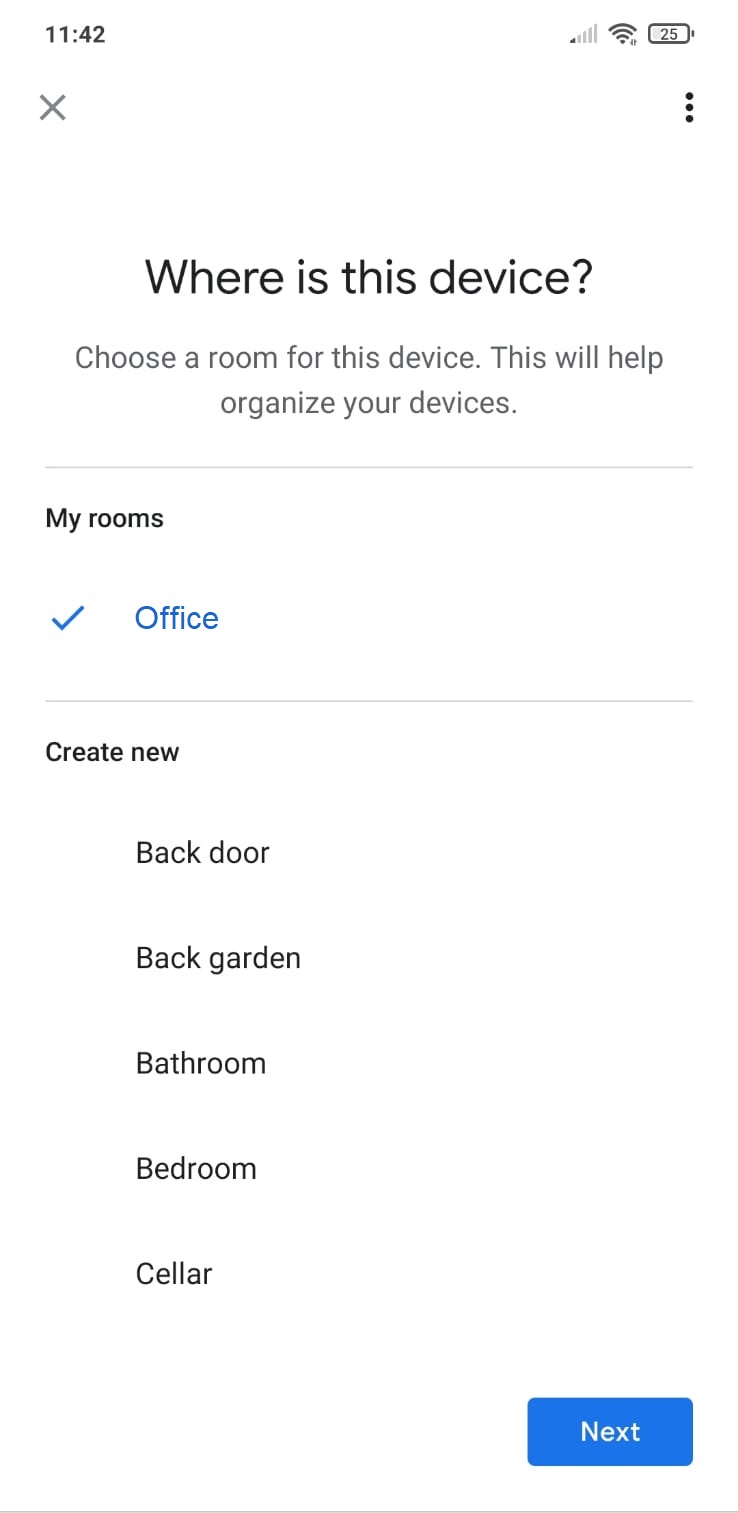
When you enter the 4HEATModule device, you must pair it with a room by clicking on “Add to a room“. Select the house where you want to move the device, if you have only one house it will be automatically selected, otherwise add another house.
If you want to move the device to another house click on the “Move device” button, you will be asked which room you want to move to, select a room and then go on.
 |
 |
 |
 |
By adding the 4HEATModule to a room you can ask Google Home to send a command to the device with the name of the room it has been paired with, instead of saying the name of the 4HEATModule device set in your 4HEAT application. (Ex: “Ok Google, turn on Officio”). You can rename the device within the Google Home application, “DEVICE SETTINGS“.
|
|
In order to turn the device on and off from the Google Home application, it is necessary to associate the device with a room. |
COMMANDS
After the configuration procedure, it is possible to communicate with the 4HEATModule. With Google Home it is possible to change or read the set temperature of the room thermostat or to switch the heating system on and off with certain commands.
Commands you can ask Google Home for the 4HEATModule (Living Room is the name on the 4HEAT app):
-
- Ok Google, is Living Room turn on?
- Ok Google, is Living Room turned off?
- Ok Google, turn off Living room
- Ok Google, turn on Living room
- Ok Google, what is the Living Room temperature?
- Ok Google, set the Living Room temperature to 30 degrees.
You can perform the same voice commands from the application by entering the device. The heating system can be switched on or off, but the room temperature can only be set if the heating system is switched on.
|
|
When the lowering and raising command is used, the temperature is increased or decreased by 2 degrees. |
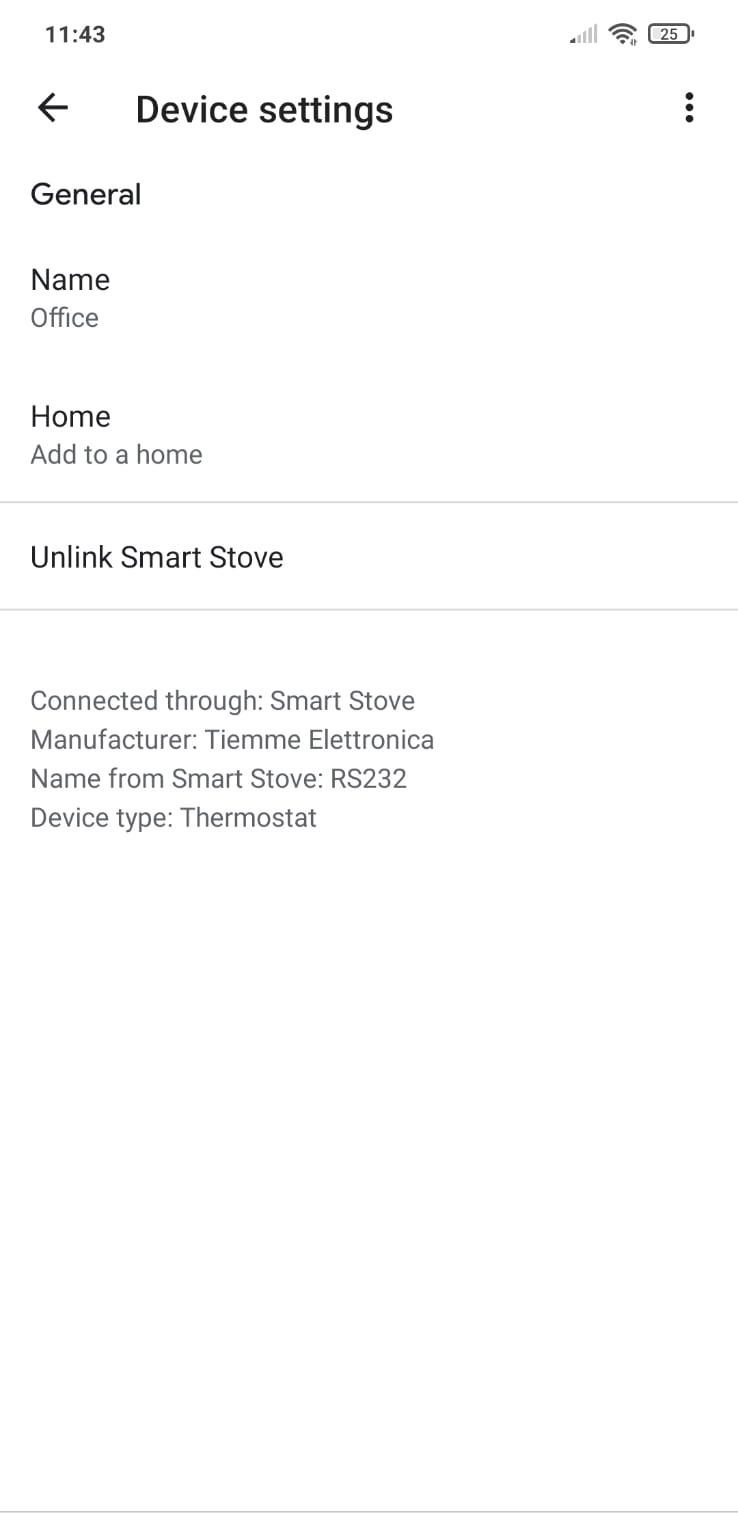
DEVICE SETTING
By staying within the device and going into settings, it is possible to make these changes:
- Name: the device is renamed only within Google Home, but it does not replace the one within the 4HEAT application;
- Home: it allows changing the home paired with the device;
- Room: it allows changing the room paired with the device;
- Disconnect Smart Stove: it removes the Smart Stove which allows using the 4HEATModule, taking us to the Home Control page;
- Info: information related to Smart Stove control is displayed.
1.Configuration Error
1.1.SSID CONFIGURATION ERROR: n03, n04, n25
Symptoms
- An error occurred during the exchange of information on the local network and its password
Resolution
- One-to-one connection loss with 4heat
- If in manual, enter the SSID correctly
- Repeat the procedure
1.2.DHCP CONFIGURATION ERROR: n01, n02, n26
Symptoms
- Error in the PIN swap phase of the 4heat name and connection information with the local router. With DHCP enabled or not
Resolution
- One-to-one connection loss with 4heat
- Repeat the procedure
1.3.ERROR WRITING MAP FILE: n05, n09, n12, n16, n19, n23
Symptoms
- Error writing map file on smartphone
Resolution
- APP Permission Issues
- Repeat the procedure
1.4.ERROR WRITING DEV FILE: n06, n13, n20
Symptoms
- Error writing device file to smartphone
Resolution
- APP Permission Issues
- Repeat the procedure
1.5.ERROR FILE WRITE WID: N07, N14, N21
Symptoms
- Error writing the widget configuration file on your smart-phone
Resolution
- APP Permission Issues
- Repeat the procedure
1.6.CRO FILE WRITING ERROR: n08, n15, n22
Symptoms
- Error writing chrono configuration file in smartphone
Resolution
- APP Permission Issues
- Repeat the procedure
1.7.FILE GENERATION ERROR: n10, n17, n24
Symptoms
- Error generating system files
Resolution
- APP Permission Issues
- Repeat the procedure
1.8.COORDINATES CONFIGURATION ERROR: N11, N18
Symptoms
- 4heat geolocalization Error
Resolution
- Check your phone’s data connection
- Enable GPS coordinates of your smartphone
- If the procedure is successful change the coordinates using the weather change in the settings menu of the device
- Repeat the procedure
1.9.UDP BROADCAST RESPONSE ERROR: N27, N34, N35, n36
Symptoms
- Error in response received from 4heat following UDP broadcast call for 4heat search after local network binding
Resolution
- Make sure your home network supports UDP broadcast protocol
- Repeat the procedure
1.10.MAP FILE ERROR: N28, N29, N30, N31
Symptoms
- Error exchanging information between server and 4heat device to download the necessary map file to the configuration
- Compatibility error with the control card that you are connected to
Resolution
- Make sure that you are under the same network as the 4heat when prompted by the APP
- Contact the service by providing an indication of the type of mother board you are trying to configure
- Repeat the procedure
2.Firmware update errors
2.1.FIRMWARE UPDATE ERROR: n02, n03, n05, n06
Symptoms
- No response from 4heat following the firmware update request
Resolution
- Check the network connection
- Check to be under the same 4heat network
- Repeat the procedure